
In part one of this article series on keeping your photos safe, I tried to scare you (hope it worked) by sharing all the reasons your data is in danger. In part two, I surveyed some of the choices for storage devices as you consider your options for backup workflow. And here in part three, we’ll begin talking about how to truly protect yourself.
Here’s the catch: Even if we diligently store our work using the most sophisticated drive arrays the industry has to offer, then back up our work, and then back it up again, it may not matter. Things can still go south. In part one of this series, I warned you about a list of dangers. Not only can your hard drives outright fail, your data can become corrupt for a variety of reasons. We need to talk about ways beyond hardware and redundancy to protect your archive. We need to discuss protecting the little things as we practice “backup workflow.”
Keeping Your Photos Safe: Maintaining Data Integrity
The first step in our workflow practice should not be simply hitting the proverbial backup button. We need to also ensure that the data we are moving from device to device is healthy data. Yes, your data can get sick or be corrupted. As mentioned earlier in this series, HDDs (Hard Disk Drives) or SSDs (Solid State Drives) are still susceptible to a thing called bit-rot, or data decay. There are a variety of things that can cause data-decay. Fortunately, it’s rare, and it’s easy to protect against it.
When protecting against data decay, the trick is in a thing called a checksum. In short, a checksum is a way to verify file integrity. So, whenever a file is copied or moved, your data can be checked against the state of the source file. If anything is out of order, if anything has changed, you’re alerted to the issue and can hopefully recover your file from another trusted and checked source. There are generally two ways to incorporate checksumming into your workflow. We can use synchronization software with the ability to validate our files, or, if using Lightroom, we can simply convert our files to DNG upon import.
Whichever computer platform you use, there is synchronization software available. Many photographers who run Macs use a program from Econ Technologies called ChronoSync (econtechnologies.com). For Windows, I suggest looking at a program called Beyond Compare (scootersoftware.com). Each allows you to synchronize data from either one drive to another or one folder to another. Most importantly, each has the ability to compare your files and folders to verify their validity after a data transfer. This requires a technical understanding of how your chosen software works, so please do read the user’s manual before incorporating such tools into your workflow.
Beyond validating your data, synchronization programs like the aforementioned (and there are many others) do a lot more. I wouldn’t say that they are a required part of your backup workflow, but for those of you who have big archives or are on the path to creating a big archive, incorporating such tools into your workflow sooner rather than later is a good idea. Synchronization programs can also be scheduled to automatically perform backups every so often, when you sleep, or when you’re not home. They can do incremental copying, detect when a change has happened to a folder or file, and archive each backup as you make them—more on archiving later.
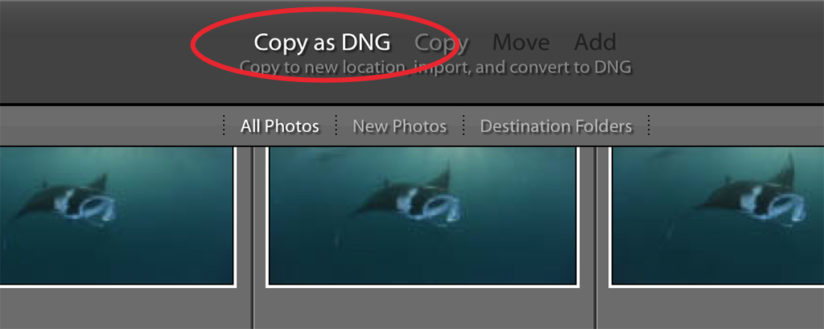
Of course, there is an easier way to validate your backups. Meaning, I realize that as I bring up checksumming, I also understand that learning new programs and incorporating new steps in the workflow may not be something that excites a lot of you. So, alternatively, you can simply convert your files to DNGs when using Lightroom (see Figure 2). DNG (Digital Negative) is an openly documented RAW file format from Adobe.
Tip: Some cameras, like Leica and Hasselblad, allow for saving files in the DNG format. Unfortunately, if you are one of these camera shooters, it doesn’t mean you can just skip the “Copy as DNG” on importing. The checksum hash isn’t added in camera, so you still have to run through the “Copy as DNG” step to gain that benefit.
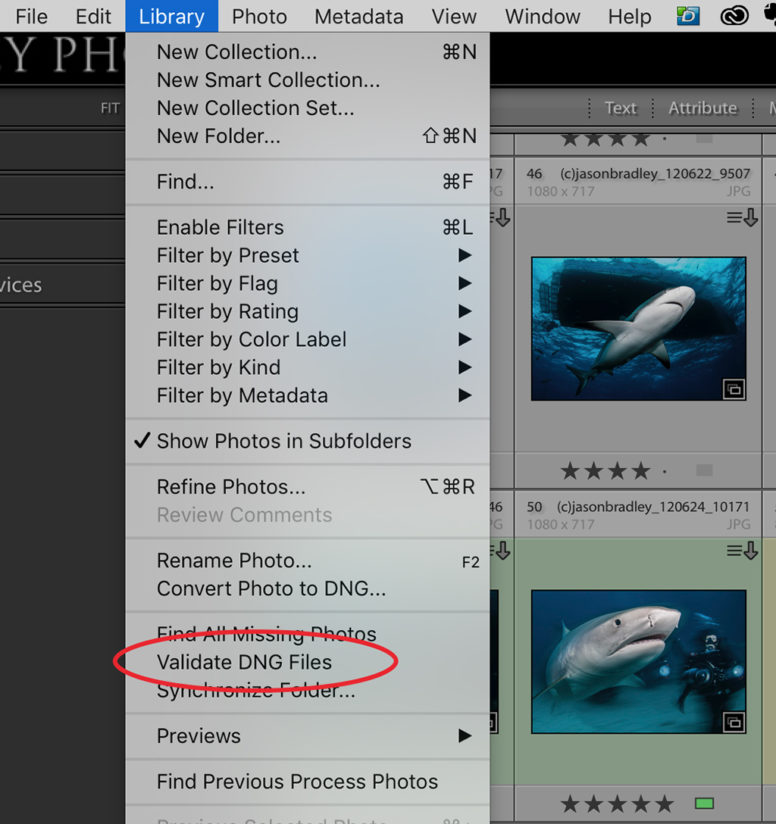
There are lots of benefits to using DNGs, in addition to file validation. DNGs work faster in Lightroom than other RAW formats, they are smaller in size, and they eliminate the need for side-car files. Converting to DNG is easy and is something that you can do while importing your images into your catalog. Adobe adds a checksum to your file as it’s converted, which then allows you to, at any time in the future, check the validity of that file against its original state. Just go to Lightroom’s Library menu, and then click on “Validate DNG Files,” as shown in Figure 3 below.
In any instance, the trick is to check your data after a backup, or every so often—let’s say once every six months—to make sure no data decay is happening under the radar.
But there’s one more thing in the fight to maintain data integrity, and this may have already happened to you. It’s certainly happened to me. It’s possible that you can import images into Lightroom and not know they are corrupt until sometime later. How is this possible? If you import images into Lightroom without the directive for Lightroom to build previews after import, you are actually viewing the preview generated by your camera, which can look perfectly fine. This means that if there were any problems during import caused by a faulty cable, a random static charge or whatever, Lightroom adds a checksum to your file as it is converted to a DNG, regardless of its validity. Unfortunately, there’s no way for you to know your file is corrupt without a visual inspection.
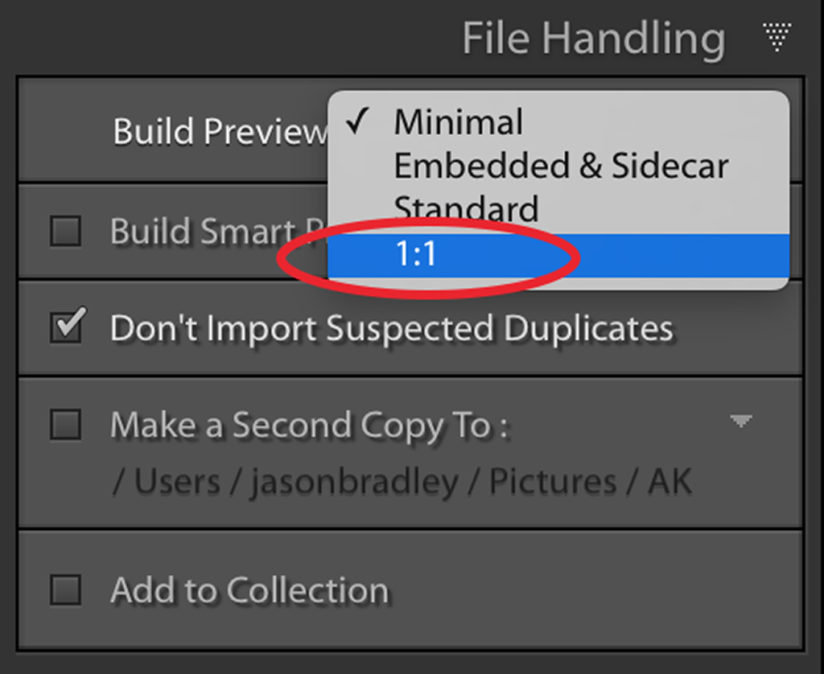
In Lightroom Classic, visual inspections can be achieved by building previews upon import and then looking through all your images (see Figure 4). I suggest building 1:1 previews, which is a full-resolution preview. I like 1:1 Previews because they allow me a bit more speed when sifting through my images in the Library Module, but Standard Previews (a slightly smaller preview) are also fine for our purposes. Admittedly, if you convert to DNG and build previews upon import, it slows down your import. But I believe it’s worth the wait and is the only path to ensure your data is healthy from the start.
Protecting Your Catalogs & Metadata
It’s one thing to protect our image files, but what about all of the work we’ve put into our files? What about all of the keywords, color labels, captions we’ve written, changes in our files’ white balance, contrast, tonality and sharpness? The effort we put into organizing and developing our images can represent countless hours of work, and, for those of us with larger archives, days or even weeks. For us Lightroom users, protecting our work is a matter of understanding how to back up our catalogs and make sure we are saving all of our metadata to our files as we go.
What is metadata? It’s defined as data about data. In Lightroom, there is organizational and developmental metadata. All the changes we make to our files in the Develop Module generate developmental metadata. Keywords, captions, star ratings and other organizational tools we use in the Library Module generate organizational metadata. Lightroom’s default is to automatically and instantaneously save all metadata—regardless of where it’s generated—to the catalog. There is never any need to hit the “save” button in Lightroom. Thus, when we back up our catalogs, we’ve also backed up our work. Furthermore, we have the option of adding an extra layer of redundancy. Lightroom allows us to not only save our metadata in our catalogs but also directly to our files.
Backing Up Your Lightroom Catalog
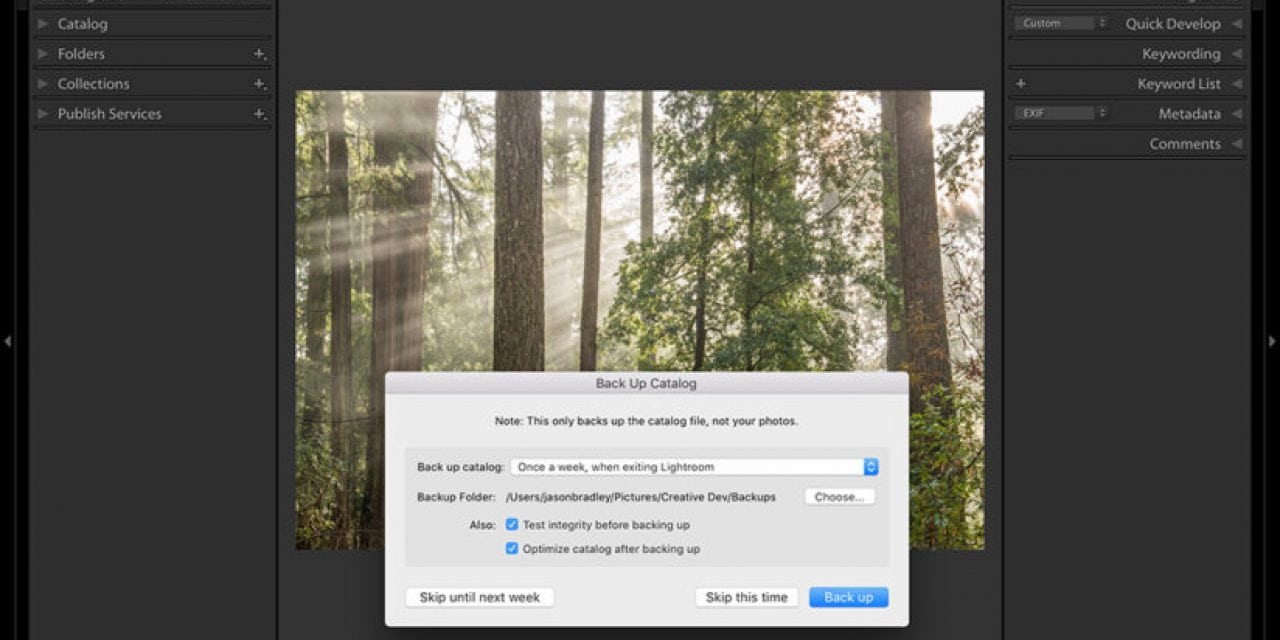
There are two things to consider when backing up your Lightroom catalog: how often you back it up, and where you back it up. I know some photographers who back up their catalog every time they quit Lightroom. Personally, I don’t think you need to do this. I back up my catalog either after a major work session or after an import. By major work session, I’m referring to the times that I do a lot of keywording, labeling, developing or other tasks that I’d rather not repeat if something were to happen to my catalog.

The first step in backing up our catalogs starts with our Lightroom Catalog Settings. On Mac computers, our catalog settings can be found by going to “Lightroom menu> Catalog Settings> General,” as shown in Figure 5. On a Windows computer, you can access Catalog Settings through the “Edit” menu. Once you’ve found General settings, you’ll see a drop-down menu with options of choosing when or how often you want Lightroom to prompt you to back up your catalog. Do what works best for you. I choose to have it prompt me each time I exit Lightroom, even though I don’t choose to actually do the backup each time.
Step two is to choose where you want to back up your catalog. When you’re prompted by Lightroom to do a backup for the first time, the default location is the same location for your main Lightroom catalog—likely your “Pictures” folder. In short, you don’t want to do this. I wish Adobe would put flashing flags or waving lights or something similar here. Storing your backup on the same hard drive as your original, let alone in the same folder, makes no sense. Because of that, I suggest storing it on one of your chosen backup drives.
Each time you back up your catalog, it’s stored in a different folder named with the date you created the backup, and all your backups are thus listed chronologically. I suggest keeping as many of your backups as is reasonable based on how big they are. If they are only taking up a few hundred megabytes of space, keep them all.
Saving Your Metadata To File
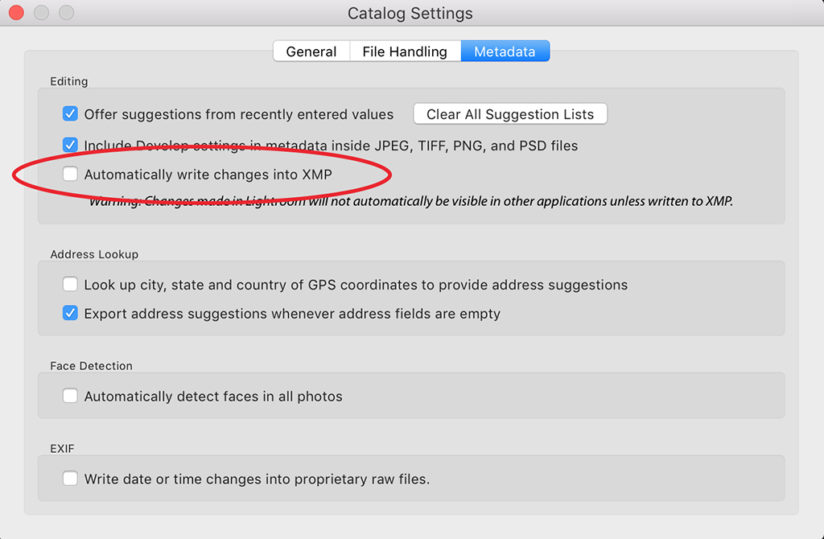
When saving our metadata directly to our image files, we can have Lightroom automatically save it for us, or we can do it manually. The settings for this choice can also be found in Lightroom’s Catalog Settings, but under the “Metadata” section instead of General. Near the top of this section is a check box allowing you to “Automatically write changes to XMP”(see Figure 6 below).Leaving it checked ensures that Lightroom will do just that. The consequence of this choice is that your catalog will run a bit slower, which will be most noticeable in the Develop Module.
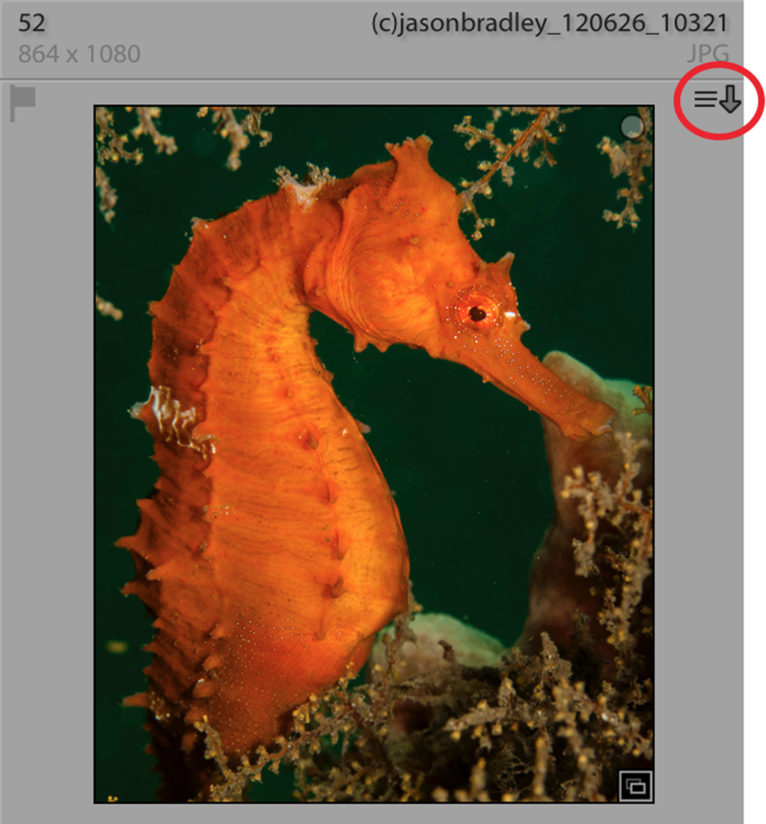
Your other option is to leave the check box unchecked. This keeps your catalog running a bit faster, but the consequence with this choice is that you have to remember to manually save your metadata. Lightroom will show you if metadata has not been saved to the file by adding a downward-facing arrow in the upper right corner of the image’s thumbnail, as shown in Figure 7 below. Simply click once on that arrow, and Lightroom will prompt you to save your metadata to file. If you need to save metadata to large groups of files, select all the files and click on one of the arrows of your selected images.
The Little Things Matter
Clearly, there is more to backing up our work beyond copying our libraries from one hard drive to another. Making sure we protect against data decay, doing visual inspections of our imported images, backing up our catalogs, and backing up our metadata might appear to some like little details. But if left unattended, these things can infect the overall health of our photo archive over time. The little things can become a big deal if ignored.
In the final article of this series, we’ll look at the big picture and build a workflow we can sink our teeth into.
• • •
Read All Articles In This Series
Keeping Your Photos Safe, Part 1: Don’t Touch Anything!
Keeping Your Photos Safe, Part 2: Tools Of The Trade
Keeping Your Photos Safe, Part 3: Protecting The Big Little Things
Keeping Your Photos Safe, Part 4: Backup Workflow
(Coming Soon)
The post Keeping Your Photos Safe, Part 3: Protecting The Big Little Things appeared first on Outdoor Photographer.