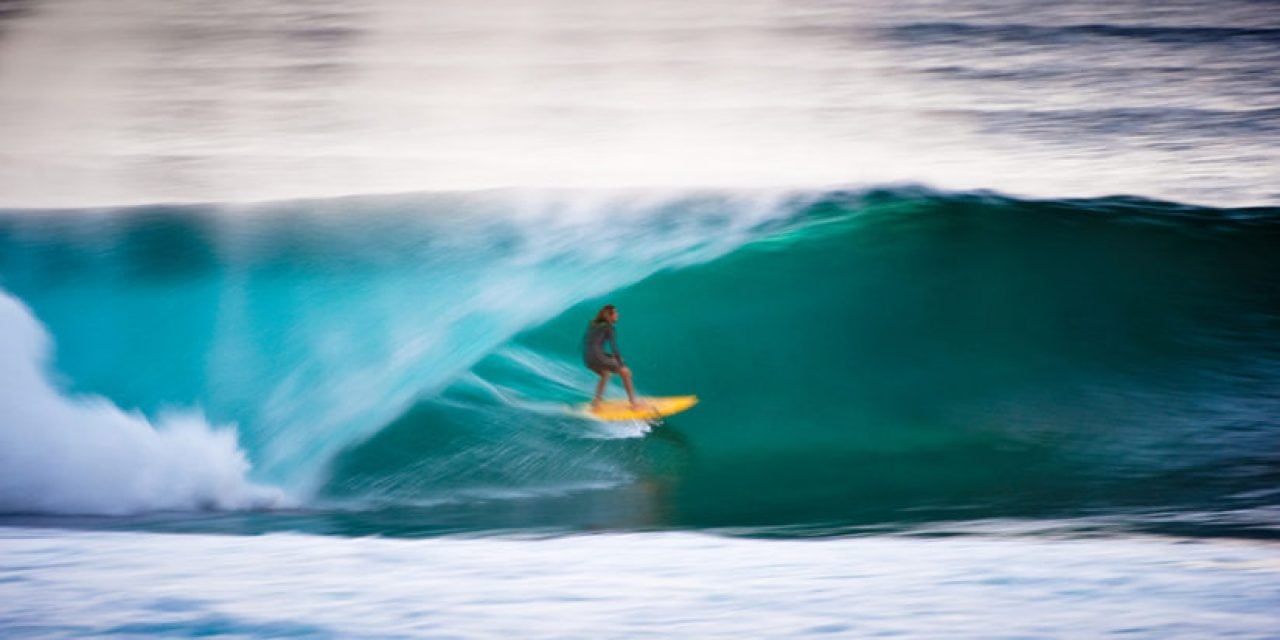
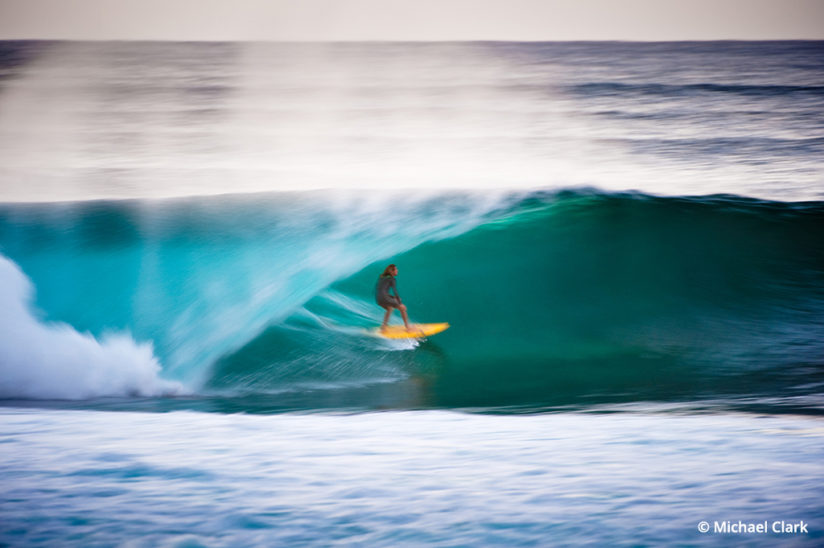
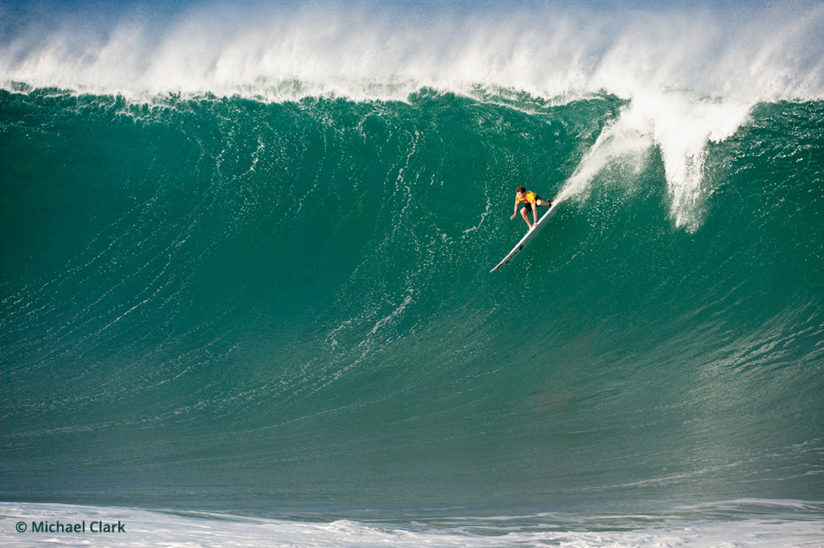
Nikon D700, AF-S NIKKOR 200-400mm f/4G ED VR II @ 400mm, Gitzo tripod, Wimberley gimbal head. Exposure: 1/25 sec., ƒ/4, ISO 200.
Surfing is one of the most exhilarating adventure sports, bar none. The athleticism and skill on display by world-class surfers pushing the boundaries of what is humanly possible on huge waves is a visual feast for any photographer. Because of this, there has been a swell of interest in surf photography. From exploding waves to surfers launching down huge wave faces, the number of photographers interested in surf photography has grown exponentially. In this article, we’ll discuss the basic techniques and what’s involved when heading out to shoot surfing.
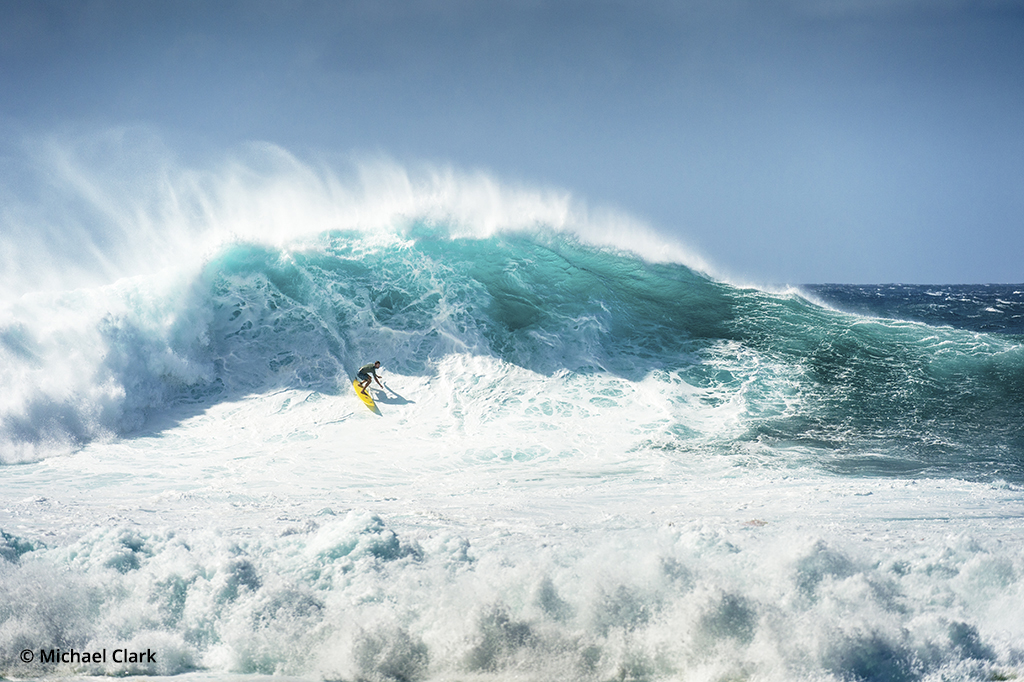
There are typically three ways to photograph surfing. First, you can shoot from the beach or a nearby pier. Second, you can shoot from a boat or a jet ski. Both of these first two options use a telephoto lens to shoot from a distance. Third, you can get in the water and shoot from inside the wave or under it. In each scenario, there are different considerations in regard to the equipment required, composing the image, focusing the camera and achieving an accurate exposure.
Shooting From The Beach Or A Pier
Working from the beach or a nearby pier is the easiest option when it comes to shooting surfing, and it normally requires a big lens, usually a 600mm lens or the equivalent. Unless you are Arnold Schwarzenegger, you’ll also need a sturdy tripod and ballhead or a gimbal head that can deal with such a massive lens.
In the old days, getting these long focal lengths meant using a 500mm f/4 or a 600mm f/4 lens. Nowadays, there are quite a few smaller and much less expensive options like the current crop of 150-600mm zoom lenses. One critical factor to think about when choosing a lens is that autofocus speed and accuracy will be tested while shooting surfing. In my experience, anything but the best telephoto lenses will miss autofocus more often than I would like, which is why I always rent a top-end 400mm f/2.8, 500mm f/4 or 600mm f/4 lens when shooting from the beach. I highly recommend draping a towel over your lens and camera to keep them from getting worked over by the corrosive ocean spray.
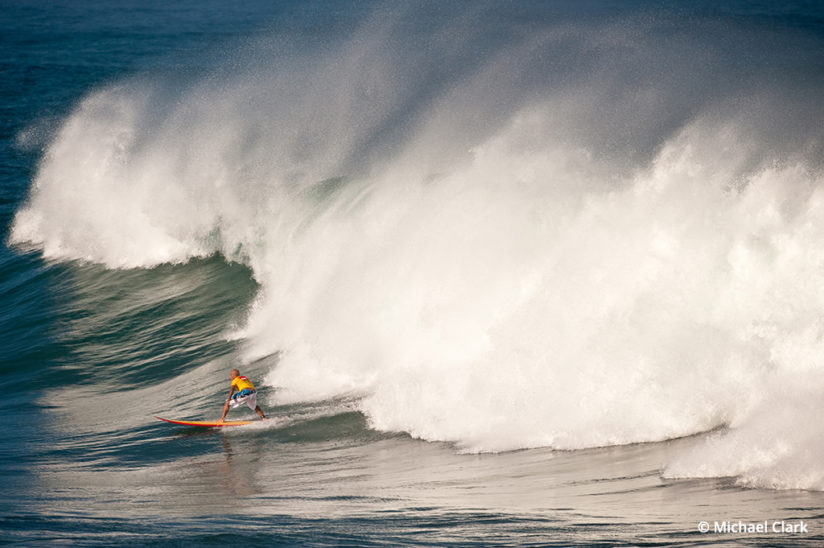
Nikon D700, AF-S NIKKOR 500mm f/4E FL ED VR, Gitzo tripod, Wimberley gimbal head.
Exposure: 1/2500 sec., ƒ/7.1, ISO 400.
In addition to a long lens, a camera that can shoot at a fast frame rate will be critical to catch the split-second action. I recommend a camera that can shoot at eight frames per second or faster. The faster the frame rate, the higher the chance of capturing the height of the action. The flip side of this, though, is that a faster camera will produce more images to go through after the fact. In general, if you shoot a full day, you can expect to have three to four thousand images or more to edit. The reality is that if you are not capturing thousands of images, then you are missing a lot of would-be-amazing surf action images.
Another issue is staying ready to shoot at any moment. On the beach there are a lot of distractions, and after a few hours it is easy to fall into a lull. Because the surfers are catching waves at will, you need to stay sharp and pay close attention for that split second when they go for a wave. Any slip in your concentration could cost you the best shot of the day. And with such a big lens, you have to be looking through the viewfinder and ready to shoot before the action starts, or you will have already missed the shot.
To get sharp images, I set the autofocus to continuous mode so the camera will continually adjust the focus as the surfer moves toward me. To compose, I choose a focus point where I want the surfer to be in my frame and then put that point on the surfer, being mindful of the shape and size of the wave. In general, you want to see the entire wave as it curls up above the surfer—especially if it is a big wave. Nikon’s 3D Focus Tracking, which is what I typically use these days, frees you up from having to concentrate on keeping the AF point over the subject and really helps when composing. Note that I also shoot at shutter speeds of 1/2000 sec. or faster to freeze the action.
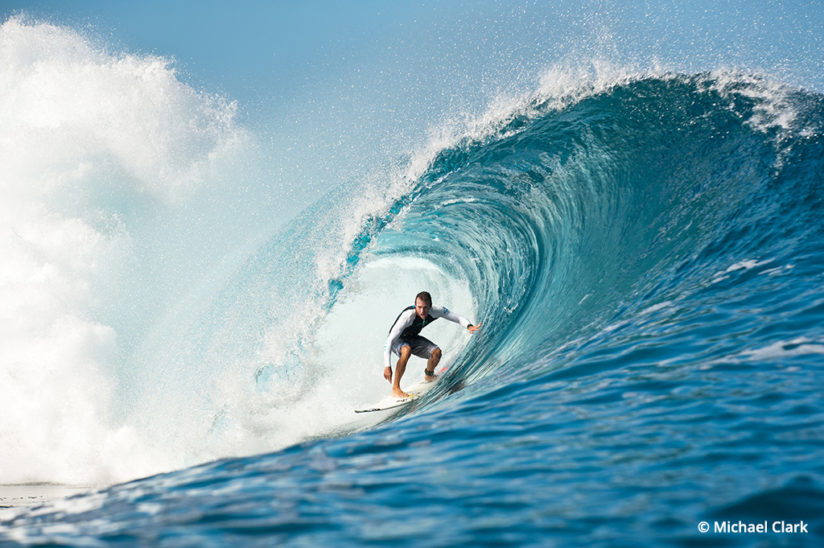
Nikon D700, AF-S NIKKOR 500mm f/4E FL ED VR, Gitzo tripod, Wimberley gimbal head.
Exposure: 1/3200 sec., ƒ/7.1, ISO 400.
To find different angles, it is easy enough to walk up and down the beach, but if you get too far away you’ll need a 1.4x teleconverter to help pull in the distant surfer. How you position yourself relative to the wave depends on the surf break and what you are going for. If you position yourself perpendicular to the wave, then you’ll be able to shoot both sides of the wave if there is a left and right break or surfers are dropping in “off the wall.” If you want to see the surfer in the tube, then you’ll have to walk down the beach for an angle that lets you see into the tube. If there is a nearby pier or jetty, either can offer a great way to line up parallel with the wave, which is an otherwise difficult proposition.
No matter where you shoot from, the key thing to keep in mind when composing the image is that you always want more room in front of the surfer than behind them. This is a typical rule of thumb when photographing any sport but especially so when shooting surfing. For surfing, this becomes tricky when the surfers cut back on the wave and change their body position. When the surfer cuts back on the wave, quickly recomposing so that there is more room behind them is key for the composition. When in doubt, I recommend shooting more loosely with a wider lens (maybe a 400mm instead of 600mm) and then cropping after the fact.
Surf Photography From A Boat Or Jet Ski
Photographing surfing from a boat or the back of a jet ski offers an incredible vantage point. Working from a boat or a jet ski isn’t much different than shooting from the shore, but it does add some complications. You have to deal with the motion of the sea, getting into and maintaining your position, and protecting your camera.
Nikon D700, AF-S NIKKOR 70-200mm f/2.8G ED VR II @ 180mm.
Exposure: 1/3200 sec., ƒ/5.6, ISO 400.
To deal with the motion of the waves, it’s easy enough to shoot with a high shutter speed and opt for lenses with built-in image stabilization. To maintain your position, it is a good idea to have someone else driving the boat or jet ski. On a boat, you probably won’t need anything to protect your camera, but when working from a jet ski, I recommend using a surf housing and a lens port that works with a 70-200mm zoom lens.
On a jet ski, a 70-200mm zoom will usually suffice since you are generally closer to the wave than when on a boat. If you are on a boat, you probably need a bit more reach—either a 300mm or a 100-400mm zoom.
One last note: If you are on a jet ski in big surf, it is highly recommended that you are ready to swim at any moment. If you are in this situation, the odds are high that you are a surfer, but for the uninitiated, having your surf fins on and your camera in a surf housing would be the basic safety precautions. At any moment while sitting on the back of a jet ski, especially when going over large waves, you could get bucked off and be forced to swim.
Nikon D700, AF-S NIKKOR 70-200mm f/2.8G ED VR II with a 1.4x teleconverter @ 270mm.
Exposure: 1/1250 sec., ƒ/5.6, ISO 400.
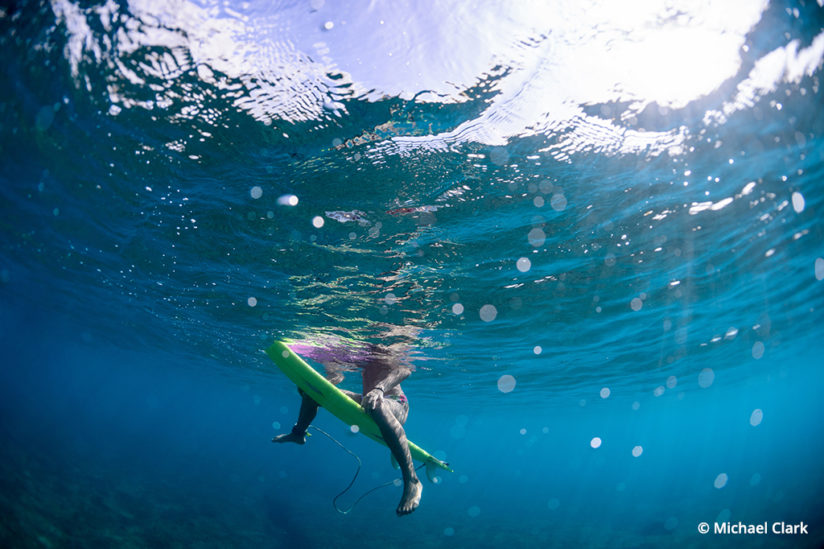
Shooting In The Water
One of the biggest decisions any surfing photographer has to make when they get to the location is whether to shoot from the beach or a boat, or to get into the water. In reality, the decision might be made for you depending on the size of the waves and your swimming skills. Getting into the water requires an entirely different skill set than shooting from the beach. It certainly helps if you are a surfer, so you can judge when and where the surfers will be as they come down or across the wave. Because you will typically have to swim a fair distance from the beach in sizable waves, it is a critical that you are a very strong swimmer and in excellent shape. There is some serious technique involved to get yourself into a wave safely and snapping the shutter as the surfer comes past you.
Surfing photographers take a pounding to get images while treading water at close proximity to surfers and know just when they need to pull through the back of the wave to stay out of trouble. It may seem obvious, but I’d recommend you take it easy and improve your skills in moderately sized waves if you are just starting to shoot surfing from the water. I’d also highly recommend wearing a hard-shell surf helmet and a pair of bodysurfing fins. The helmet will save your life if you misjudge the distance and speed of the surfer and get whacked in the head by a surf fin. The helmet will also protect your head if you smack the reef, which is a much bigger issue in many locations than getting hit by a surfboard.

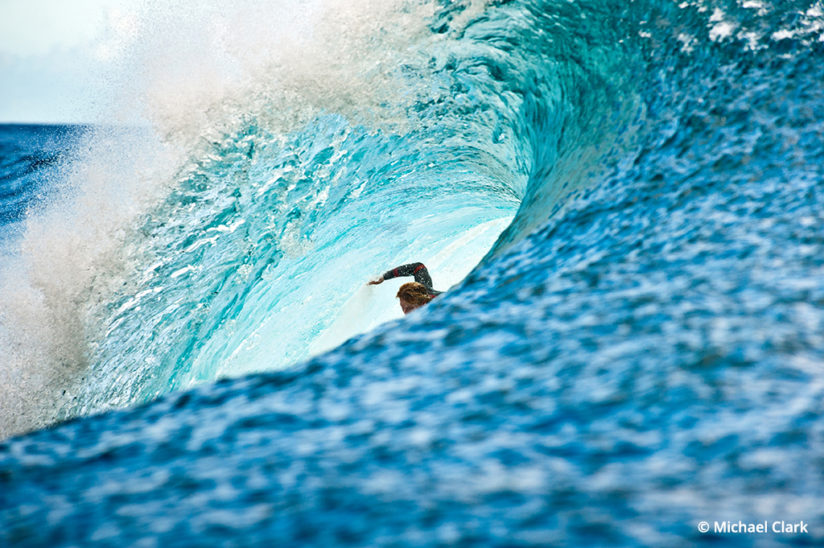
Nikon D4, AF Fisheye-Nikkor 16mm f/2.8D, CMT carbon fiber surf housing with a fisheye port.
Exposure: 1/3200 sec., ƒ/5.6, ISO 800.
When shooting in the water, a surf water housing is required. Surf housings are waterproof down to around 35 feet or so. Because you will have to swim through oncoming waves, the lighter the surf housing, the better. There are a number of surf housing manufacturers, including AquaTech, SPL, CMT and Liquid Eye, among others. A pistol grip is required to hold the camera in position, and a leash will keep you from losing the camera in heavy surf. Lastly, be sure to get a lens port for a fisheye and a 70-200mm zoom lens if you want to shoot from a jet ski or outside the wave. Because each housing is specific to the camera model, choose your housing wisely and pay close attention when inserting your camera into the housing to avoid having your camera flooded, which is an extremely expensive nightmare. I would also highly recommend using larger 64GB or 128GB memory cards so that you don’t run out of memory space while out in the water.
In general, the go-to lens for surf photography while in the water is a fisheye lens. When using a fisheye, you’ll want to turn off the autofocus and use a hyperfocal distance method to make sure everything you point the camera at is in focus. To make sure that your foreground (i.e., the wave) is still sharp, you’ll want to modify your hyperfocal focus so that you are just off the infinity mark on your lens. The odds are good that you’ll be close enough so that the surfer is only about 10 to 20 feet away, not at infinity, so this method works quite well. A good trick is to tape the focus ring on your lens (with gaffer’s tape) before you put it in the surf housing, so that when you are getting rolled around like a cat in a washing machine, the hyperfocal distance focus setting doesn’t shift inside the housing.
When using a surf housing, you’ll have to set most of your camera’s settings before you get into the water, particularly the ISO. Because it is sometimes darker inside the wave, I would suggest setting the camera to ISO 400 (or use Auto ISO) and using a small aperture like ƒ/8 or ƒ/11 to get as much depth of field as possible. When working with a fisheye lens, I shoot for ƒ/11 if I can get it. I typically have my camera in Aperture priority mode, so that the aperture stays fixed and I use an appropriate ISO setting to make sure the shutter speed is fast enough to stop the motion. Some cameras allow for setting a minimum shutter speed when using Auto ISO; if yours has that feature, I would highly recommend using it.
Nikon D4, AF Fisheye-Nikkor 16mm f/2.8D, CMT carbon fiber surf housing with a fisheye port.
Exposure: 1/3200 sec., ƒ/5.6, ISO 800.
One of the recent trends in surf photography is a pulled-back look using a 50mm lens and moving farther away from the action to show the entire wave. Another alternative is to shoot with a 70-200mm lens while sitting outside the wave. When using anything other than a fisheye, I recommend that you engage the autofocus while shooting in the water. One of the big issues when shooting in the water is that there might be quite a few other photographers trying to shoot with fisheye lenses—especially at the famous surf breaks like Pipeline and elsewhere. Good communication, both with the other photographers and with the surfers is key for everyone’s safety.
Lastly, if you are looking to get epic surf images, I recommend traveling to well-known surf breaks. Hawaii, Tahiti, Indonesia, Fiji, Australia, California and Mexico all have some of the world’s top surf breaks. All of the images included with this article were shot in either Hawaii or Tahiti. Showing up during a big swell at a famous surf break makes a huge difference—and more than likely the best surfers in the world will rally to those locations as well.
YOU MIGHT ALSO LIKE
The Post Processing Pipeline
From RAW image to radical results with Lightroom and Photoshop. Read now.
The post Surf Photography: Catching The Wave appeared first on Outdoor Photographer.