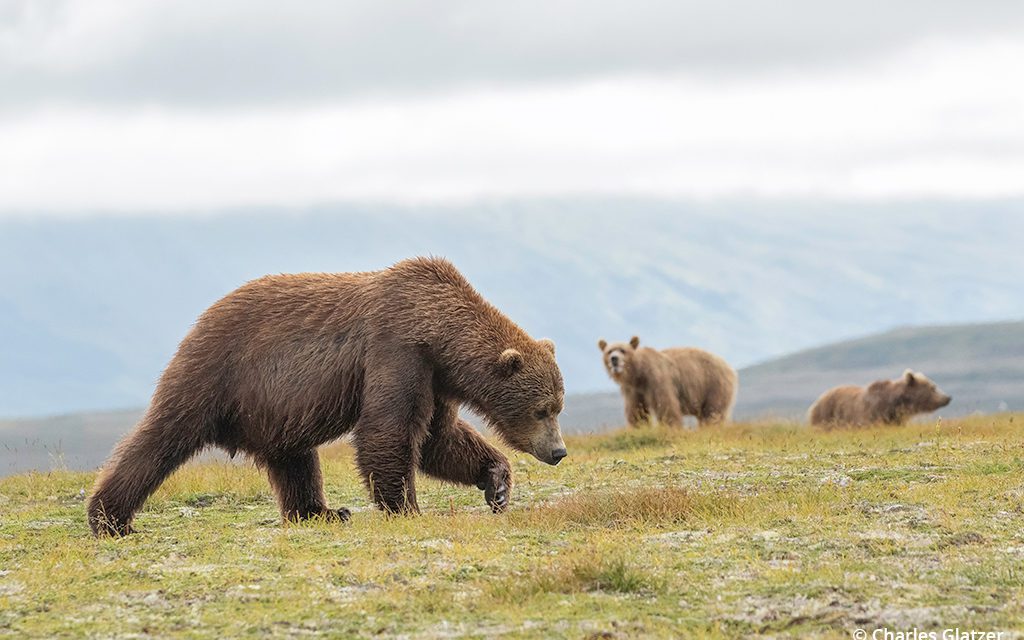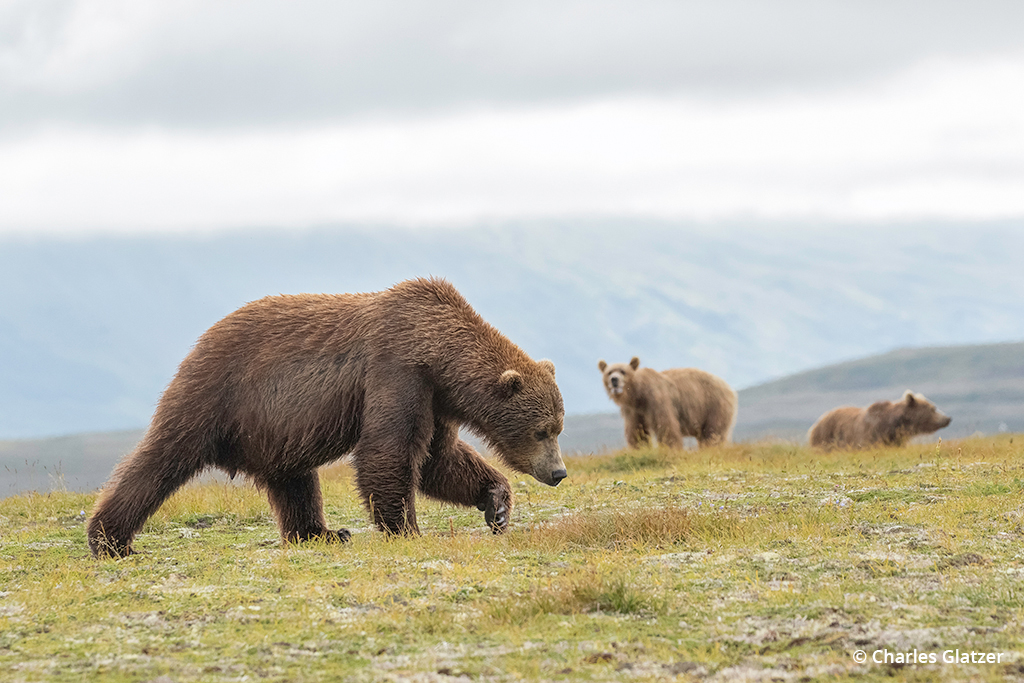
Being on the ground with bears is humbling, indeed. This bear was intent on letting the other bears know that he was boss. He would meander about following a female’s scent trail while making sure “all” species were aware of his presence.
Canon EOS 7D Mark II, Canon EF 100-400mm f/4.5-5.6L IS II USM. Exposure: 1/1000 sec., ƒ/7.1, ISO 800.
Established in 1918 as a national park and preserve in Alaska, Katmai was first designated to protect the area around the cataclysmic 1912 volcanic eruption of Novarupta, which formed the Valley of Ten Thousand Smokes. The park includes almost two dozen volcanoes, seven of which have been active throughout the past 120 years. Katmai National Park and Preserve encompasses 4,093,077 acres located on the northern Alaska Peninsula, northwest of Kodiak Island and southwest of Homer, Alaska. The current national park and surrounding lands were established in 1980 under the Alaska National Interest Lands Conservation Act, hosting a diverse variety of wildlife and including one of the largest sockeye salmon runs on the planet.
Katmai is primarily accessed by plane from Anchorage, Homer, King Salmon and Kodiak Island. Brooks Falls and remote camps and lodges along the Naknek River drainage system can be reached by small float, wheeled planes or powerboat from Naknek and King Salmon. Multi-day float trips are also available for the more adventurous.
Seasonal Habits Of The Bears Of Katmai
Having conducted over 150 bear trips, I would say bears are without a doubt my favorite wildlife subject. With approximately 2,200 brown bears estimated to reside in the park, Katmai is one of the premier brown bear viewing areas in the world. Katmai hosts a variety of habitats, with each offering unique bear behavior depending on the time of year.
In spring, the bears can be found in coastal meadows feeding on sedges and on clams in the mudflats at low tide. June is mating time; boars (male bears) can typically be found relentlessly following female bears (sows) in estrus. This often leads to confrontation among competing males, and while severe battles can and do occur among bears close in size, most often there is a lot of posturing, with the smaller bear wisely backing down to avoid injury. With bears, size definitely matters! This same dominance behavior also occurs over territorial disputes for the best fishing rights. Most bears have war wounds, especially the boars, with some of the older bears being covered in deep scars, missing ears or, worse, an eye.
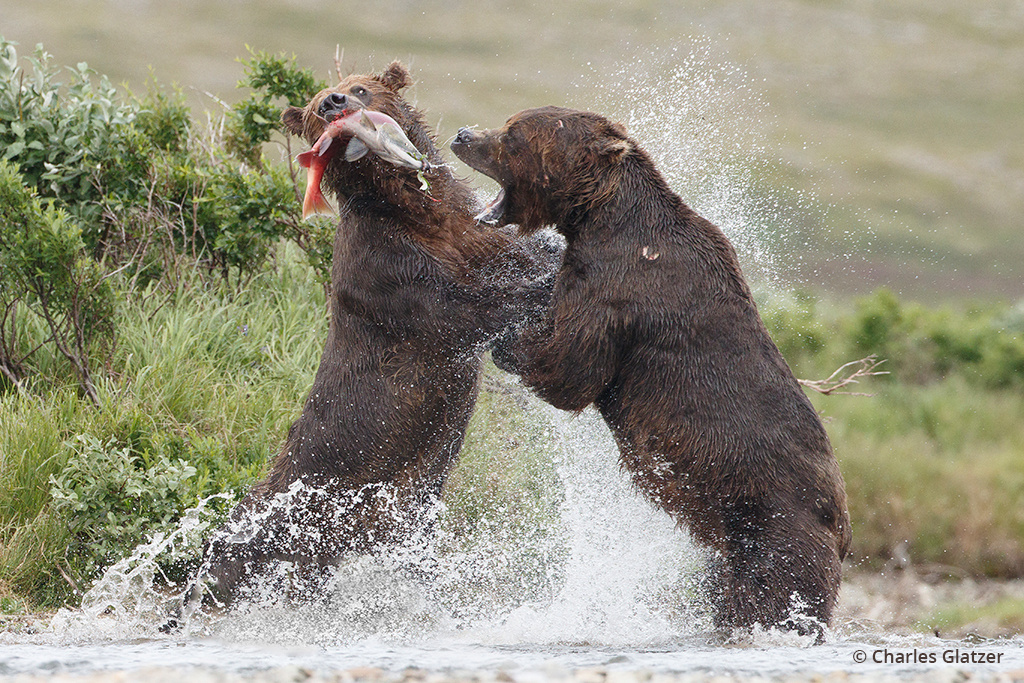
Territorial disputes over fishing rights can quickly escalate. Neither bear wants to get injured, and most often these short battles are won by the larger of the two bears. Most male bears have wounds, with many older bears appearing covered in scars inflicted over establishing breeding dominance for females. Canon EOS-1D X Mark II, Canon EF 600mm f/4L IS II USM. Exposure: 1/1600 sec., ƒ/8, ISO 1600.
Most bears continue to lose weight until salmon arrive. The abundance of bears in Katmai is directly related to the number of salmon migrating inland to spawn. Salmon provide the bulk—as much as 75 percent—of the caloric intake of Katmai’s insatiable coastal brown bears. Brown bears can eat dozens of salmon per day. The average salmon is approximately 4,000 calories. Large males can consume over 6,000 pounds of fish per season, with adult females eating on average 3,000 pounds.
The salmon begin to gather at the river mouths in late June, and by the end of July, a million fish may have made their way from Bristol Bay into the Naknek system of lakes and rivers. In July, the bears become almost frenzied chasing the early salmon that start to make their journey upstream. As the salmon run builds and the fish numbers increase, so does the bears’ opportunity for catching fish. Bears come from far and wide to the rivers, and each brings with it a unique style of fishing. Some hide stealthily behind bushes along the river edge, pouncing on unsuspecting fish as they pass by; others dive into deeper pools from the bank; more chase fish in the shallows, causing the fish to strand themselves on the bank; and some snorkel with their heads half-submerged, looking for schooling and pooling fish.
In September and October, bears mostly scavenge on carcasses and dying salmon. In early to mid-fall, the bears enter a physiological phase called hyperphagia, where a sense of urgency takes over to gain as much weight as possible before entering their winter dens.
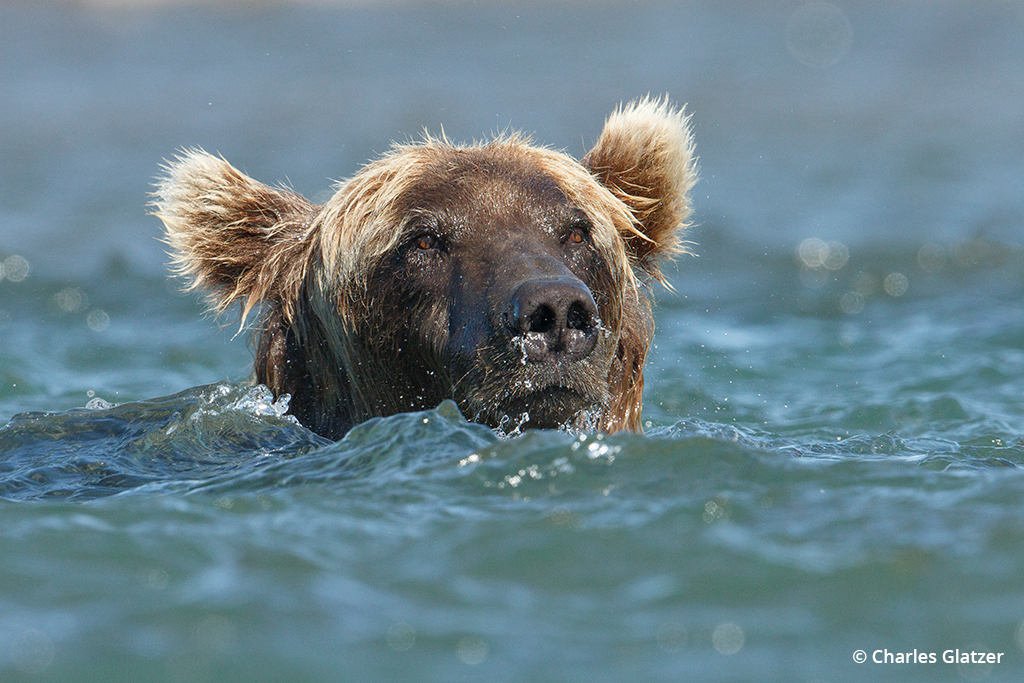
It is amazing to watch the different fishing behaviors individual bears have developed to catch fish. Young, excited bears will often vainly attempt to dive onto any nearby fish; the older, educated, stealthy bear will hide behind a bush on the river’s edge, pouncing on a fish just as it swims past; still others will snorkel with their heads underwater, trying to look for pods of fish or carcasses on the river bottom. This bear was a snorkeler, seen here just coming up from a look underwater. Canon EOS-1D X, Canon EF 600mm f/4L IS II USM with Canon Extender EF 1.4x III. Exposure: 1/1600 sec., ƒ/10, ISO 800.
Bear Behavior & Safety
The more you understand bear behavior, the safer and more enjoyable—and photographically productive—your trip will be. Mental awareness of the animal’s proximity to you and its surrounding is key to staying safe.
Familiarize yourself with the park’s guidelines and regulations before traveling in bear country. Many coastal brown bears are familiar with people and their habits, especially around fishing lodges, and often respond differently to people at closer distances than might an inland grizzly who lives where few humans are ever encountered.
Remember, each bear is an individual and has unique tolerances toward people. Giving bears space is of utmost importance. Always move slowly backward at an initial sign of anxiety. Slow, steady and predictable behavior on your part is best. Never run!
Bears have different motivations for approaching humans, arising out of curiosity, defense or predatory behavior. Watch the bears—they will know another bear is approaching long before you do. Always have a safe area to make an exit, and never put yourself in a position where you are surrounded by bears.
If a bear continually fixes its gaze or an ear in a direction other than fish, I would bet another bear will soon appear. Ears that are pointed forward typically indicate curiosity or dominance. Ears flattened back on a bear’s head are indicative of stress or perhaps defensiveness. If the bear stands up, it is not an outward sign of aggression but rather a means to garner information and a better view of its surroundings, its cubs’ whereabouts or a rival’s approach. Scent is the bear’s best sense, and they can smell fish (or anything else, for that matter) from quite a distance. A bear’s eyesight and hearing are said to be on par with our own.
Jaw popping and yawning are typical early signs of anxiety; huffing vocalizations may also occur. Heed the warning: The bear is telling you it feels uncomfortable, so back up. If the stress is not alleviated, the head may lower, followed by side-to-side wavering and a “mum, mum, mum” vocalization. At this point, in a confrontation between two bears, they will typically begin posturing around each other, with one or both deciding to either engage or flee confrontation. As with human encounters, most confrontations are quickly deescalated, as neither wants to risk injury.
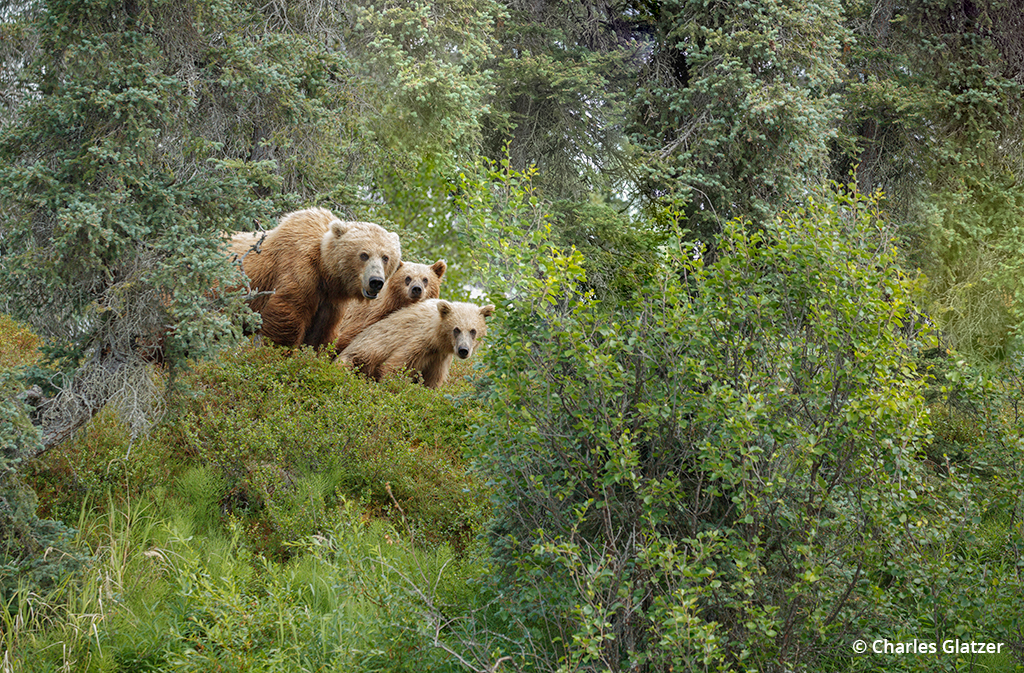
As we drifted down the river in our jon boat, we came across this sow with cubs. She appeared a bit nervous, keeping the cubs far back in the bushes. Recognizing her anxiety, we kept our distance and quickly moved on.
Canon EOS-1D X Mark II, Canon EF 100-400mm f/4.5-5.6L IS II USM. Exposure: 1/640 sec., ƒ/5.6, ISO 1600.
When visiting bear country, the more eyes the better. If in a group, everyone should remain observant, sharing information at all times. Being able to recognize anxiety and knowing how to diffuse the situation is critical to maintaining the safety and well-being of all concerned. Your response during a bear encounter should depend on the bear’s behavior.
Gearing Up For Katmai National Park
Katmai is located between the Pacific Ocean and the Bering Sea, a battleground between two climatic zones. The weather at times is unpredictable, and you are likely to encounter cool temperatures, strong winds and wet weather throughout the spring, summer and fall. The National Park Service estimates that the skies are clear about 20 percent of the time in summer. Rain can last for days at a time, with July averaging 19 days of rainfall at 2.3 inches, high temperatures around 64° Fahrenheit and lows around 48°.
Clothing
As always, preparedness is key, so plan for the worst and hope for the best. Check the forecast as closely as possible to your departure date and alter your clothing accordingly. Modern high-tech synthetics offer a plethora of lightweight, highly compressible materials to meet your thermal requirements. Look for fabrics that offer excellent breathability, wind resistance and waterproofness.
For your base layer, I recommend wicking undergarments like power dry, silk or merino wool. Zippers, snap tops or buttons at the neck are, in my opinion, necessary for proper venting and maintaining comfort under exertion. Do not wear cotton. Cotton is known as the death fabric in cooler temps, as it stays wet, zapping valuable energy and dropping your core temperature.
A polar fleece or synthetic jacket is recommended as a middle layer. Both of these fabrics maintain a degree of warmth even if wet. I prefer my mid-layer to have a hood.
An ideal outer layer is a high-quality, breathable, waterproof jacket and pants, two of the most important pieces of clothing you can own. Get the jacket one size bigger than you normally wear, so that you can layer clothing underneath. A built-in companion hood and pit zips are also important.
Insect Repellant
Mosquitoes and black flies can be quite annoying during the warmer months. You can wear thin surgical gloves to keep the little buggers from munching your hands.
When possible, I prefer not to use DEET. Sawyer Permethrin spray, the same chemical used in “bug-off”-type clothing, is a good option. Unlike topical insect repellents applied to the skin, permethrin is applied to clothing and outdoor gear material. (Do not use it on your skin or Gore-Tex fabric.) Wear a long-sleeved shirt, and be careful not to inhale the spray. I spray my hats, socks, shirts and pants outdoors; thereafter, I hang all garments outside to dry thoroughly before packing. Once dry, the product is completely odorless, bonding to the fabric fibers for up to six weeks (42 days) or six washings. This stuff works amazingly well.
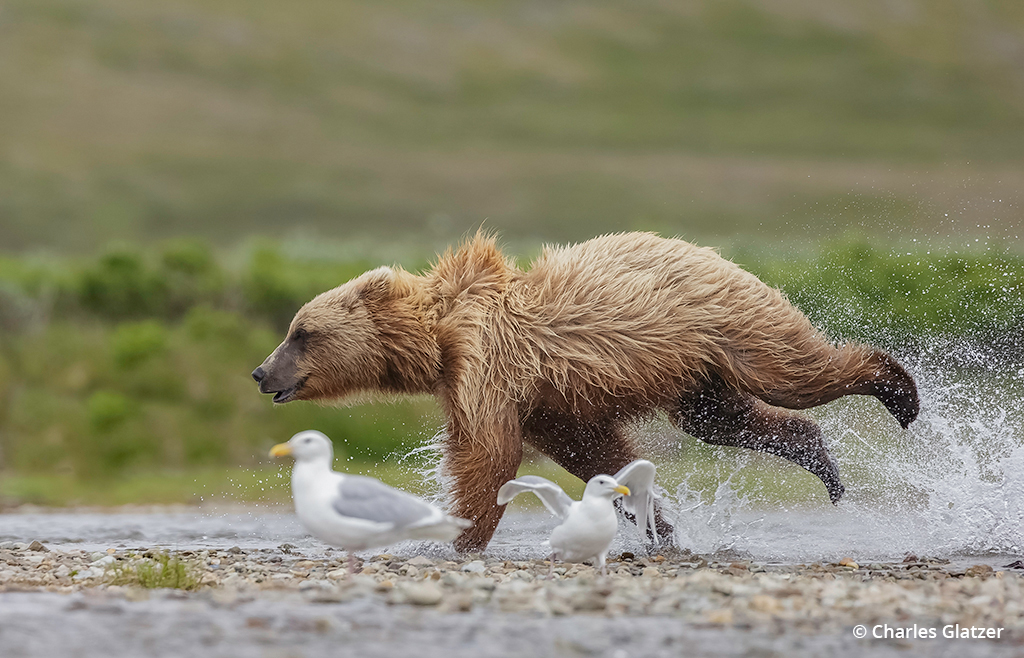
Young bears are constantly on the move, being harassed by older, larger bears as they try to catch fish and scavenge for leftovers.
Canon EOS-1D X, Canon EF 500mm f/4L IS USM. 1/1600 sec., ƒ/5.6, ISO 800.
Waders
Much of the time spent in Katmai includes getting wet from rainy weather, getting in and out of boats, boarding and disembarking floatplanes, and shooting images from within the river or along its edge or within tidal and coastal areas. I highly recommend wearing chest waders (stocking foot-style) with separate rubber-soled boots when photographing bears around water in Katmai. If you intend to photograph from within the water, remember it is on average 40° Fahrenheit, and it can get bone-chillingly cold after a while. Make sure you wear warm wool socks and thick polar fleece or synthetic insulated pants under the waders. If necessary, you can attach chemical heat packs to your socks prior to placing your feet in the waders.
Sun Protection
Hats, gloves, sunglasses and sunscreen. Weather-resistant wool or polar fleece gloves and beanie/toque are recommended. Sunglasses help remove glare off the water to better see the fish. Sunscreen is a must, too.
Luggage
Wheelless, waterproof duffles like the NRS Expedition DriDuffel are best for Katmai trips. Most of the smaller float or wheeled planes request soft-sided luggage, with the overall weight allowance limited on these small flights. You definitely want a waterproof bag if it’s a downpour outside, or your bag is being placed in the bottom of a boat for the ride. Dry clothing is a good thing—wink.
Photo Gear For Bear Photography
Cameras & Lenses
I highly recommend bringing two camera bodies. You can avoid having to change lenses in inclement weather and have more focal lengths at your disposal for those quick, fleeting moments. I’m currently using the Canon EOS R5.
Depending on my mode of travel and weight limitations, I typically take at least three lenses to photograph brown bears. For me, those include the Canon RF 24-105mm F4 L IS USM wide-to-telephoto zoom, the RF 100-500mm F4.5-7.1 L IS USM tele zoom, and either the Canon EF 400mm f/2.8L IS III USM or EF 600mm f/4L IS III USM super-tele prime. If I need to go lighter or feel I do not need the extended reach, I will substitute the 100-500mm zoom and 400mm (or 600mm) prime with the Canon EF 200-400mm f/4L IS USM Extender 1.4x, which has a built-in 1.4x tele extender.
Filters
I rarely use filters for wildlife photography, as the animals are most active at dawn or dusk, when light is usually at a premium. That said, I will bring a polarizer and a 3-stop neutral density filter along for those times when I wish for a blur effect or to reduce glare in water highlights. I also carry a 1-5 hard stop graduated ND with me for video.
Stuff Sacks
I use Sea to Summit Big River waterproof stuff sacks for organizing my gear in the boat, covering my lenses and bodies in pouring rain, transferring gear to and from the boat, as a ground cloth and more—the uses are seemingly endless. I can even leave them full of air, employing them as a cushion or pillow. The 35L fits the big lenses and camera body, the 20L accommodates a mid-tele and camera body, and smaller sizes are great for smaller wide-angle lenses and accessories. Just remember, nothing should be left on the ground at any time—unless you want it to be molested by the bears.
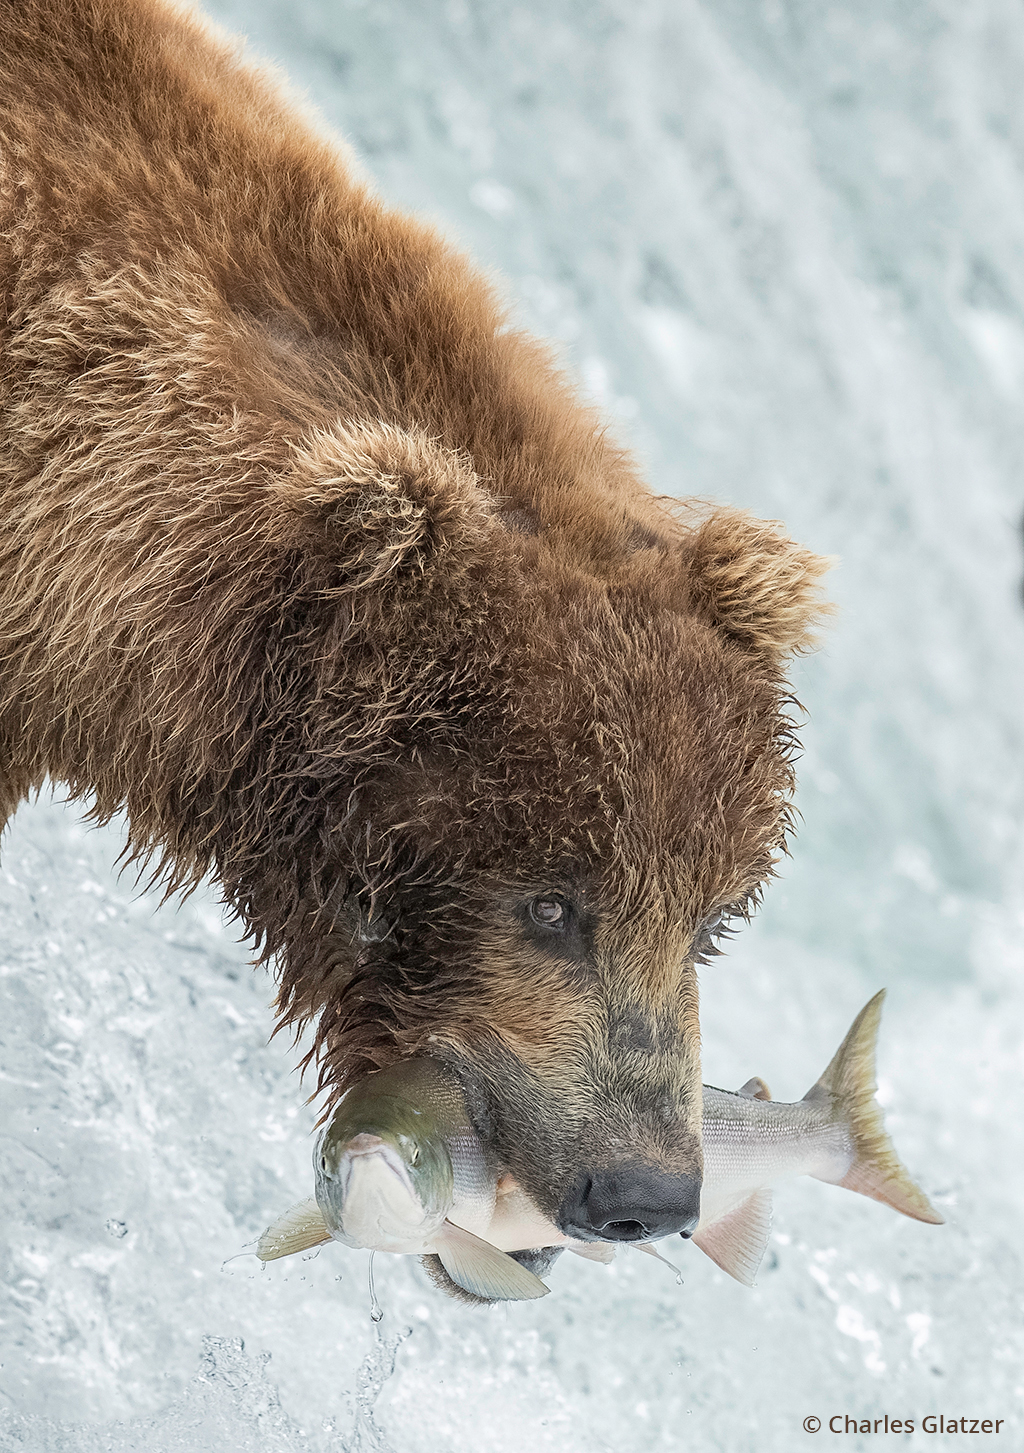
Brooks Falls is famous for its bears. Each year as tens of thousands of salmon attempt to leap up the falls on their way upstream, hungry bears try to pluck them out of the air. It is truly a sight to behold, and while it can be a bit of a circus at times, with many people trying to observe and photograph the bears, it is definitely worth a visit. Canon EOS-1D X Mark II, Canon EF 600mm f/4L IS II USM. Exposure: 1/1600 sec., ƒ/5.6, ISO 1600.
Photo Backpack
Of the bags I’ve used, the best-made photography adventure backpack is the f-stop Mountain Series. My most-used model is the Tilopa 50L equipped with the optional Pro XLarge ICU. This is the real deal, a fully functional, comfortable photo-featured backpack for fieldwork. If necessary, I can hump 40 pounds of gear without issue. The bag is extremely weather-resistant and even more so if used with the rain cover. Moreover, the ICU (internal camera unit) is self-contained and can be easily pulled out for carry-on on smaller flights. The Tilopa fits in the overhead of a regional jet.
Rain Covers
Most high-end cameras and lenses are very weather-resistant, some more than others. But even a slight nick in a gasket or o-ring can prove disastrous on location. I prefer to use caution, especially when in remote locations where acquiring an additional body is nearly impossible on short notice. I use rain covers in anything more than a drizzle. Moreover, covering the gear in muddy conditions is not a bad idea.
When using rain covers on external push/pull-type zoom lenses, I find it best to loosen the locking collar and zoom by grabbing the lens hood and racking the lens in and out, rather than trying to use the rubber zoom ring under the cover. I prefer LensCoat RainCoat Pro covers as they are quick and easy to deploy.
Tripod
A tripod can be a great asset when used to support heavy gear that you cannot handhold for extended periods. A tripod is beneficial to stabilize and support gear when set up on a particular subject, particularly when you must keep your eye on the viewfinder, but is of little advantage when shooting in a boat (unless grounded).
That said, unless you cannot handhold the gear, a tripod can be more of a detriment than an asset. A tripod is cumbersome, bulky and weighty to transport in the field. The need to adjust a tripod’s legs impedes our maneuverability and speed when having to quickly alter our position relative to the subject—think raising or lowering the tripod. Additionally, when trying to track an erratically moving subject, it becomes difficult to pivot our body around the tripod. So, consider whether you need one—a tripod serves no purpose when you can support the gear handheld, and your intent is to freeze motion at fast shutter speeds.
Tips For Bear Photography Success
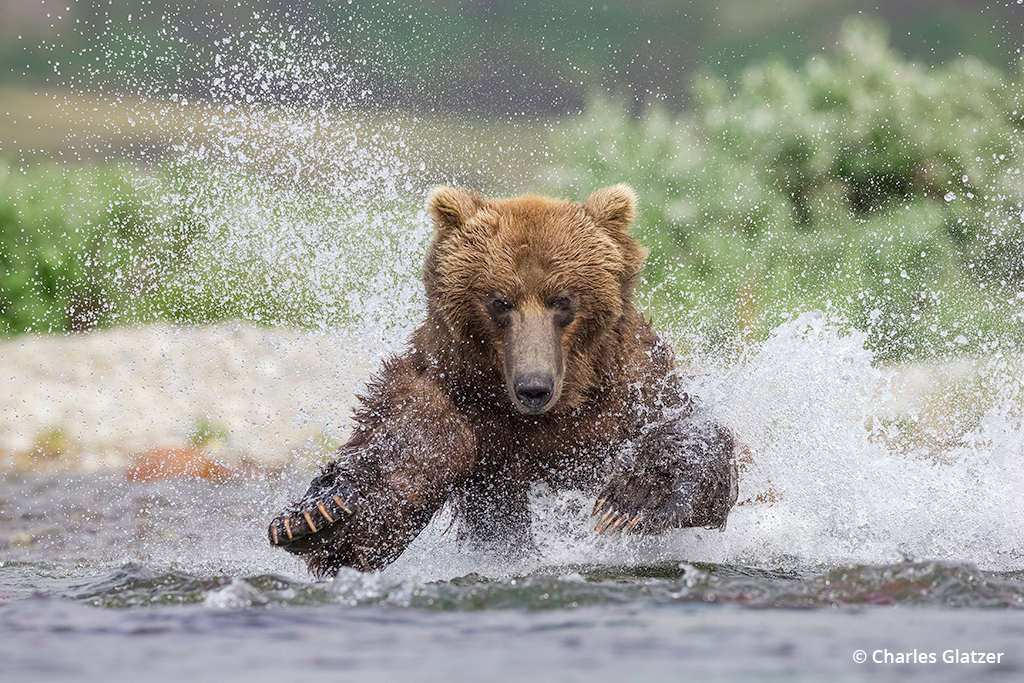
I watched numerous bears trying to catch migrating salmon as they passed over a shallow area. Hoping to catch a bear running straight toward me, I positioned myself low in the water directly across from the shallows. I was extremely pleased when the bear looked up just before pouncing on the salmon.
Canon EOS-1D X, Canon EF 500mm f/4L IS USM. Exposure: 1/1600 sec., ƒ/7.1, ISO 800
To maximize the potential of an area and its subjects when on location, always gather as much information as possible prior to arriving. Talk to others who have been there before, but never assume things will be exactly the same. Ask questions! The more questions you ask, the more prepared you will be.
Be proactive, not reactive. A bit of forethought goes a long way. It means first seeing the image in your mind and then figuring out the tools and techniques necessary to capture that vision. It means checking the exposure ahead of time before the decisive moment occurs. It is not always about where the subject is at the moment but rather where it is going to be at the time of exposure. Being proactive means I have taken a static bird image in the shade and now want to change my exposure and increase my shutter speed ahead of time to capture flight images when the bird takes off into sunlight. It means visualizing the best composition beforehand and waiting for the subject to move into a compositional power point before depressing the shutter.
When you see a subject, choose a “window of opportunity,” an area wherein the subject will have both the best lighting and background. The amount of illumination helps determine the exposure, while the quality and direction of the light source relative to the subject and camera position render the scene and subject with dimension. Before exposing a single image, look for the best vantage point, angle of view and direction of light.
Your images should tell a story. Wildlife photography is not all about filling the frame with the subject. As a general guideline, I try to maintain a subject size between 25 to 30 percent of the image, as this provides the viewer with a sense of context and scale. It’s often the little things that make the biggest difference in an image’s overall impact. Composition and backgrounds—sometimes overlooked in the heat of the moment—can make or break an image. You can often eliminate distractions and competing elements within the frame by slightly altering your position, going vertical, waiting for the subject to move or zooming slightly. Scour the viewfinder and eliminate distractions—less is usually more.
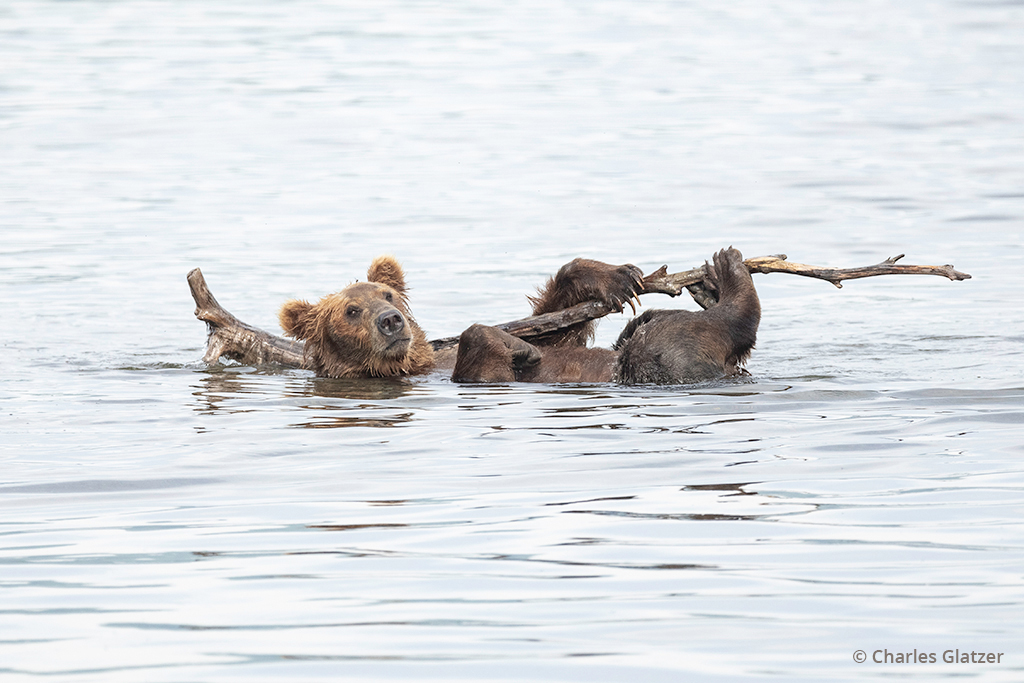
Bears are extremely intelligent, and they will often play with similar-aged bears or by themselves with almost any object that piques their curiosity. This bear was a hoot to watch as it rolled and held the stick with its paws, tossed it around the water and used it as a back scratch.
Canon EOS-1D X Mark II, Canon EF 600mm f/4L IS II USM. Exposure: 1/1600 sec., ƒ/5.6, ISO 1600.
Same light equals same exposure. Typically, the weather in Katmai is overcast, often for days on end. This makes determining the correct exposure much easier. As the quantity and quality of the light are consistent throughout much of the day, I prefer to use manual exposure mode, locking the exposure in-camera, so it does not deviate, regardless of the tonal values in the meter pattern. Check your histogram frequently, making sure you are close to the right edge without clipping highlights.
Try to get low. I will often sit in the water or in the bottom of our boat to get a lower vantage point. Shooting on the same level as the subject provides a more intimate and impactful glimpse into the animal’s domain. You get to observe and share the world from the animal’s perspective. It is also very humbling to be lower or on the same level as one of the world’s largest, most formidable predators.
See more of Charles Glatzer’s work at shootthelight.com.
The post Bears Of Katmai National Park appeared first on Outdoor Photographer.

