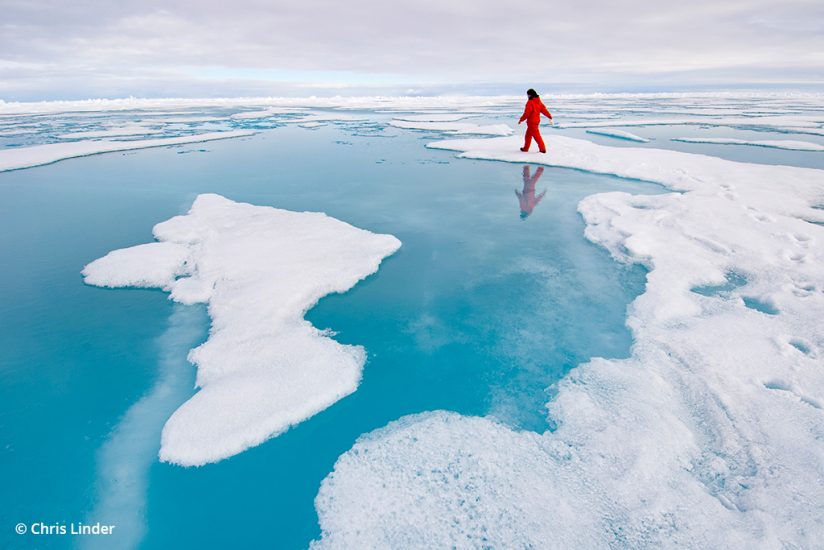
A scientist walks along the edge of a melt pond in the Arctic Ocean to take a water sample. My eye was immediately drawn to the strong landscape composition made by the ice “island” in the melt pond. I anticipated the scientist’s route and started shooting as she walked into the frame. Photo credit: Woods Hole Oceanographic Institution, Chris Linder. Nikon D2Xs, AF-S DX Zoom-Nikkor 12-24mm f/4G IF-ED. Exposure: 1/250 sec., ƒ/11, ISO 100.
From the polar regions to tropical rainforests, I have visited the literal ends of the planet during my 20-year career as a science and conservation photographer. Regardless of the subject matter or location, my mission on each assignment is the same: Use photography to educate the public about how environmental scientists study the natural world. For me, there is no greater reward than putting my photographs to work teaching and inspiring people, whether it’s through a museum exhibit or a slideshow presented to kids at my local elementary school. I want them to vicariously experience the adventure of working in nature and the thrill of making new discoveries.
An Unexpected Journey
My career path has taken many unexpected turns, but every experience has contributed to inform my approach to photography today. Growing up, I liked nothing better than being outside, usually up to my knees in mud in a nearby stream or pond. I was enthralled by The Undersea World of Jacques Cousteau television program and set my sights on studying the oceans.
I followed my dream to the U.S. Naval Academy, where I majored in oceanography, and afterward earned a master’s degree from the Massachusetts Institute of Technology & Woods Hole Oceanographic Institution. I then served in the Navy as a meteorologist in Spain, and this is where I picked up a camera for the first time. I was instantly hooked on photography and used every opportunity to explore the natural parks of southern Spain with my camera.
When I left the Navy and returned to Woods Hole Oceanographic as a researcher, I brought my love of photography with me. While working as a member of the scientific crew on oceanography expeditions, I began to photograph the experience of being at sea and my colleagues at work. My two obsessions—science and photography—were united at last, and I set out to create a new niche for myself as a science photographer.
Looking down on the main deck of the icebreaker from above, I wanted to communicate the size of the broken slabs of multi-year sea ice sliding by the side of the ship. Once I had refined my composition and settings, I waited for the perfect arrangement of ice slabs to flow by. This photograph was used for one of the daily slideshows I produced for the Polar Discovery project, an educational “live from” virtual experience funded by the National Science Foundation and produced in conjunction with professional science writers and web designers from the Woods Hole Oceanographic Institution. Later, it also became the cover photograph for my hardcover book, Science on Ice: Four Polar Expeditions. Photo credit: Woods Hole Oceanographic Institution, Chris Linder. Nikon D2Xs, AF-S DX Zoom-Nikkor 17-55mm f/2.8G IF-ED. Exposure: 1/400 sec., ƒ/7.1, ISO 400.
I was an early convert to digital photography and quickly realized how this new technology could transform science storytelling. With my new digital camera (at the time, a Nikon D100) and a portable satellite-based modem, I could illustrate the day-to-day operations of scientific expeditions from anywhere in the world.
During the 2007-2008 International Polar Year, I applied for and was awarded a grant from the National Science Foundation to document a series of polar expeditions from the Greenland ice sheet to Ross Island, Antarctica. I assembled a team of freelance science writers, plus web and graphic designers from the Woods Hole Oceanographic Institution, to create our expedition blog website (polardiscovery.whoi.edu). To increase our reach, I also enlisted a network of science museums across the country to host live talks connecting museum audiences with scientists at work on the ice. After that project concluded, I created a hardcover book of polar expedition photography, Science on Ice: Four Polar Expeditions (University of Chicago Press), with essays contributed by the science writers.
To date, I have photographed 53 scientific projects and spent over two years of my life on assignment in the polar regions. Here, I will share the philosophy, tools and techniques I’ve used over the years to create photographs of science that both educate and inspire.
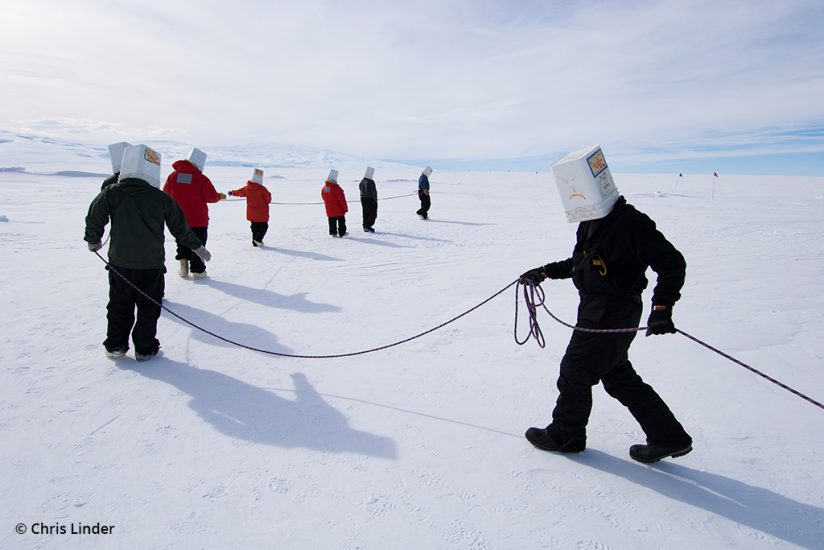
One challenge of the “happy camper” survival class at the National Science Foundation McMurdo Station research base in Antarctica is a team exercise to simulate finding a colleague lost in a blizzard. To replicate whiteout conditions, the students wear buckets on their heads. I positioned myself so that the line of trainees formed a curving line leading into the frame. The face drawn on the nearest bucket helmet facing me was a lucky gift. Photo credit: Woods Hole Oceanographic Institution, Chris Linder. Nikon D2Xs, AF-S DX Zoom-Nikkor 12-24mm f/4G IF-ED. Exposure: 1/640 sec., ƒ/8, ISO 100.
Eyes In The Field
The need for environmental advocates has never been more urgent. Climate change, pollution, loss of habitat and biodiversity—the list of challenges facing the natural world grows every year. As storytellers, we can make a difference. Very few scientists have the skills, time or funding to produce high-quality photographs and video to visually document their work. That’s where photographers come in. With our expertise, we can help scientists reach a broader public audience, inspire more people to care about conserving wild places and protecting threatened species, and raise awareness about the impacts of climate change and pollution.
Our challenge as storytellers is to seek out the story arc and then determine what photographs will illustrate it. In addition to the obvious who, what, where and why, I also photograph behind-the-scenes moments on an expedition—overcoming logistical hurdles, deploying instruments, and in some cases simply surviving the elements. These supporting scenes flesh out the larger story of the expedition as a whole and put human faces on the data and discoveries. It’s all part of revealing a hidden world that few are privileged to see, the complex inner workings of science expeditions.
I have never felt so energized as when I’m working on an expedition. There is tremendous pressure—you never seem to have enough time—but making art under pressure can often lead to breakthroughs. At the end of the day, the satisfaction of knowing that you’re working to make a difference for the planet is what matters.
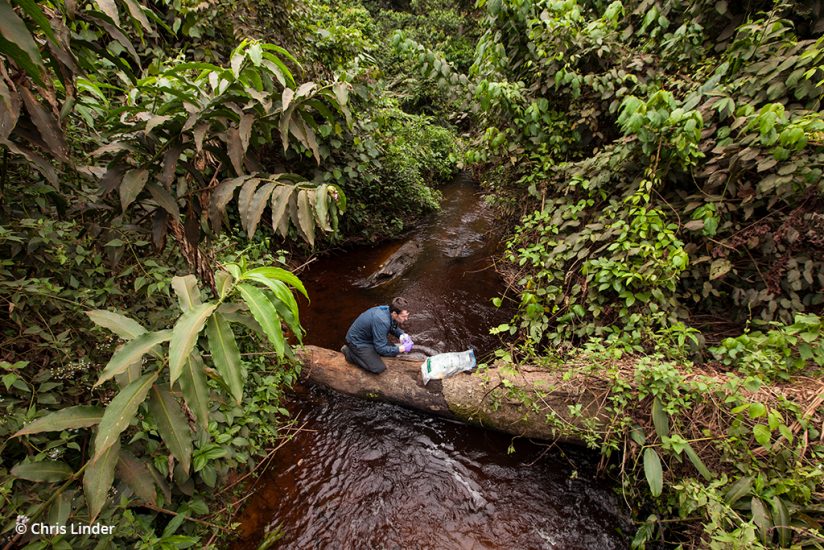
A wide-angle lens allowed me to include the dense jungle vegetation in this photo of a river chemist from the Woodwell Climate Research Center taking a water sample in the Congo rainforest. I used the still photographs, video clips and interviews to craft a six-minute multimedia video about the expedition. Canon EOS 5D Mark II, Canon EF 16-35mm f/2.8L II USM. Exposure: 1/80 sec., ƒ/6.3, ISO 400.
Finding A Project
Embarking on a new project can be a bit intimidating. My advice is to start locally. Find a nonprofit conservation organization, college or research institution in your area and browse their staff or faculty’s ongoing projects. Look for research topics that resonate with you.
Before firing off an email, do some background work. If you’re interested in working with a specific scientist, for example, read their most recent published papers. Even if you don’t understand everything in the papers, you should get a better feel for that person’s work, and you will have some talking points to break the ice.
In that first conversation, I recommend having a list of reasons why the scientist should work with you. Firstly, what excites you about their work? How are you going to use photography to bring their science to a broader audience? Do you have partner organizations you are working with (museums, magazines, a local school) to help enhance the exposure of the photographs? Are you working alone or collaborating with a writer or other artist?
Assuming this first conversation goes well, and you’ve been invited to join some fieldwork, it’s time to get down to planning for the shoot.
The salty icicles hanging from a slab of upturned sea ice made a perfect frame for this portrait of a scientist at work on a NASA project studying arctic sea ice. The photographs from this expedition were used by NASA and collaborating scientists for an educational website and presentations. Nikon D3S, AF-S NIKKOR 24-70mm F2.8G ED. Exposure 1/160 sec., ƒ/22, ISO 800.
Pre-Shoot Planning
The first thing I do when planning for an expedition is to interview the scientists and staff about exactly what they will be doing in the field. Some of the questions I typically ask include: How will we get around in the field? What instruments will they use? And, most importantly, what are they hoping to learn? Essentially, I aim to understand as much as I possibly can about the project before we begin.
Next, I make a list of every conceivable image that I think I will need to tell the story—knowing full well that once I get into the field, that list will inevitably change. I divide the list into several categories: scene setting (landscapes, the big picture), scientists at work, and detail shots. Extensive planning and previsualizing help me decide what gear I will bring and how I will carry it. The planning process can take hours to weeks, depending on the complexity of the project and the remoteness of the location.
Choosing Equipment
I use a diverse array of photographic tools depending on the specific needs of the project. This is why it is so critical to understand the logistics and exactly how the scientists will collect their data. Are they collecting water samples from a small boat? Will I be able to get into the water, or will I have to shoot over the side? I often practice specific setups at home so that I can work more efficiently in the field. As an example, I recently published a hardcover book about Arctic permafrost thaw and, after talking to the science team, decided that a photograph of methane bubbles coming out of the lakes was a critical concept. To get that image, I needed an underwater housing for my DSLR and a wetsuit, plus hours of practice.
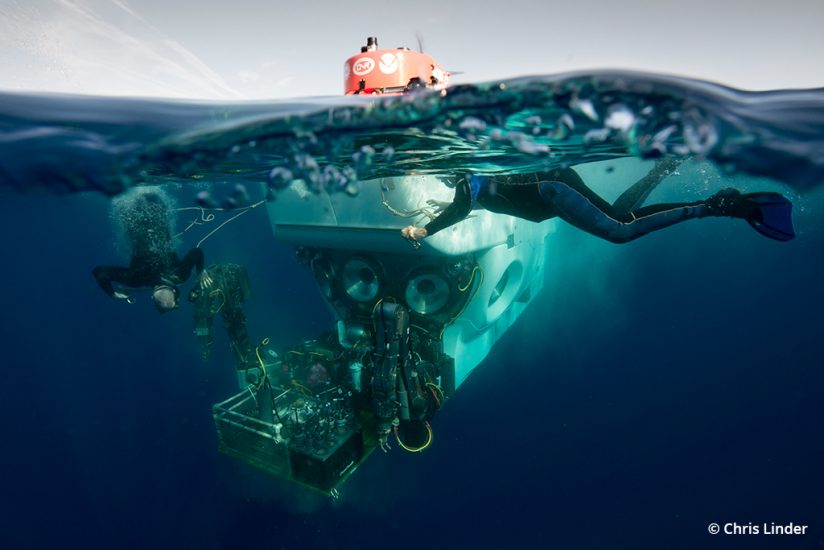
The iconic manned research submersible Alvin, operated by the Woods Hole Oceanographic Institution, returns to the surface after a dive in the Gulf of Mexico. I used an AquaTech water housing with a large dome port to capture the action above and below the ocean’s surface. The photographs from this expedition were used by the Woods Hole Oceanographic Institution to educate the public about recent upgrades to the submersible’s capabilities. Photo credit: Woods Hole Oceanographic Institution, Chris Linder. Nikon D800, AF-S NIKKOR 18-35mm f/3.5-4.5G ED, AquaTech water housing. Exposure: 1/250 sec., ƒ/11, ISO 720.
When I am photographing scientists as they do their work, I typically use two cameras, one with a standard focal length zoom (24-70mm) for establishing shots and scientists at work in the environment, and another with a telephoto zoom (100-400mm) for details. This two-camera setup covers 95 percent of my needs. Occasionally—for example, working on very small boats where I can’t back up—I will use a wider 14-24mm zoom. Depending on the project, I may also bring a 105mm macro lens for photographs of scientific samples. If scientists are working with wildlife, I will bring my favorite telephoto lens, the AF-S NIKKOR 500mm f/5.6E PF ED VR.
I also pack a variety of portable lights, including a continuous LED light and two small hotshoe flashes with collapsible softboxes. I bring a heavy-duty Gitzo tripod and Really Right Stuff ball head for landscape photographs but shoot handheld when photographing scientists at work. My general approach to equipment is “less is more.” I prefer to travel fast and light, since getting the shot often means I have to jog ahead of scientists moving through the landscape to get into position.
Creative Development
Photographing science stories requires a generalist approach to photography. Landscapes, aerials, people, wildlife and macro photographs may all be needed to tell the full story. What I may personally like to photograph doesn’t enter into the equation; every photograph must advance the story. Otherwise, it’s precious time wasted in the field.
Indeed, one of the most challenging—and fulfilling—aspects of expedition photography is being forced to work outside of your comfort zone. You might really love landscape photography and be a bit shy or uncomfortable photographing people, for example. Forcing yourself to learn how to make competent photographs in other genres helps you to grow as a photographer. Every time you push that shutter button, you should be learning and honing your craft. You may even surprise yourself and fall in love with a new genre, technique or style of shooting.
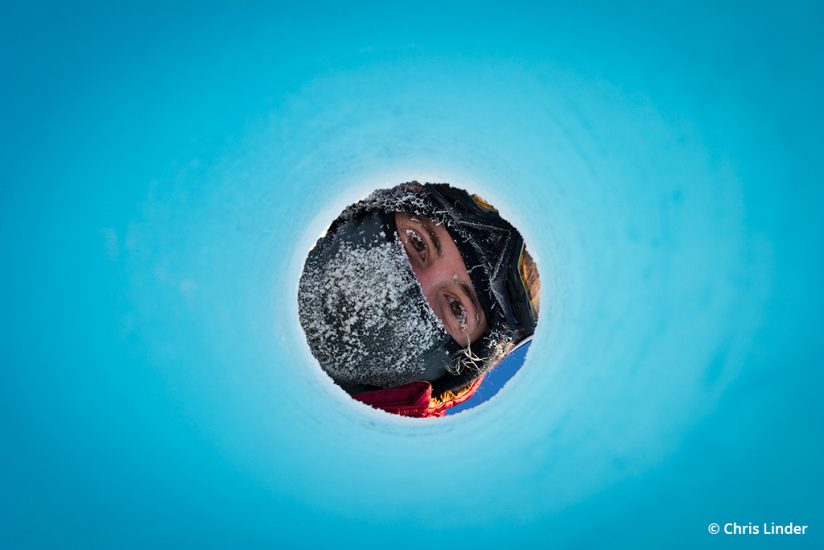
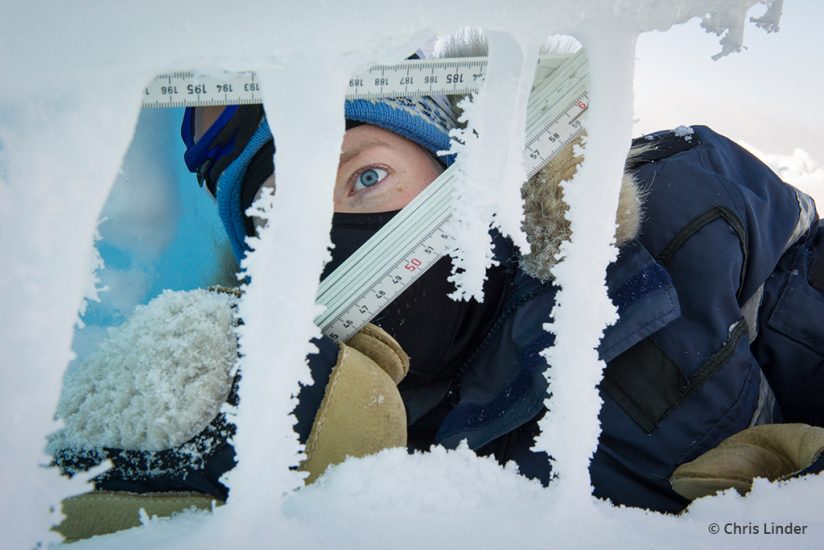
A scientist from University of Washington peers through a hole cored through sea ice in the Beaufort Sea. I had to slide my camera under the ice slab to get this unique angle looking up through the ice. The sunlight filtering through the ice gave it a beautiful blue color. Nikon D3S, AF-S NIKKOR 24-70mm F2.8G ED. Exposure 1/125 sec., ƒ/16, ISO 400.
Typically, the most important image on my shot list is one that shows scientists working in the context of the landscape. Examples include penguin scientists dwarfed by a colony of thousands of birds or a river chemist taking samples from the bank of a glacial stream. This kind of “story backbone” image informs the viewers where the events are taking place, who is doing the work, and what the scientists are studying.
I begin hunting for these types of images early in the project by first searching for a compelling landscape image. After finding this ideal backdrop, I make a mental note of the best time of day for the light and where I need to stand to capture the action. I coordinate with the scientists ahead of time, so I can always be one step ahead, asking where they plan to work for the day and scouting the location before they arrive. I then set up early to capture the moment when the scientists move into this preset frame.
I very rarely pose or direct my subjects as I prefer not to slow down or interfere with the scientists’ work. I also always have a camera with me because magic moments often happen organically, and a specific combination of light, weather and action may never come together a second time.
Partnering To Increase Impact
Now that you’ve photographed your story and have a brilliant selection of photographs, the next question is what do you do with them? How do you get your story seen, and what will the depth of the impact be? This is where the real hard work starts.
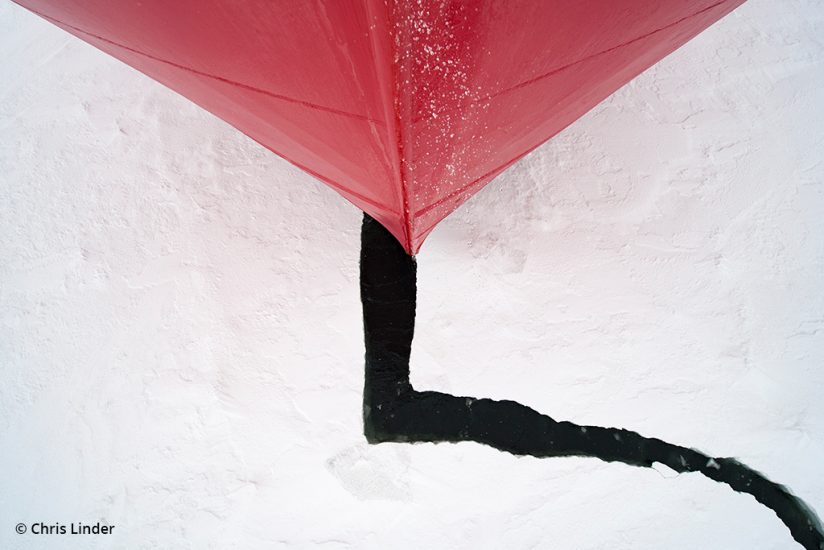
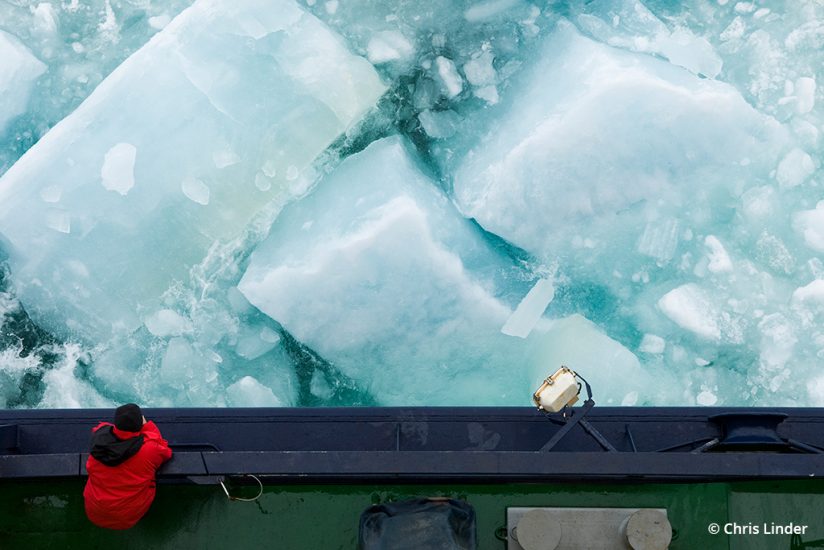
To frame an abstract, bird’s-eye perspective of icebreaking aboard the U.S. Coast Guard vessel Healy in the Bering Sea, I held my camera on a monopod out over the ship’s bow and triggered the shutter remotely. Photo credit: Woods Hole Oceanographic Institution, Chris Linder. Nikon D700, AF-S NIKKOR 14-24mm F2.8G ED. Exposure: 1/1250 sec., ƒ/8, ISO 400.
For any given project, I probably spend a third of the time researching and preparing, a third actually shooting, and a third trying to get those photographs seen. With the exponential explosion of digital photographs (an estimated 1.43 trillion taken in 2020 alone), it has never been a tougher time to stand out from the crowd. Even if you’ve taken the best photographs the world has ever seen, if you just put them on your personal website or social media, how many people will actually see them, and what kind of impact will they have?
While social media provides some easy metrics in the number of likes or shares, how meaningful is someone clicking a like button? This is why partnerships with education and media professionals are critical. Lean on their expertise in knowing how to reach and engage with their audience. This is another opportunity to exercise creativity since there is such a wide variety of possibilities. Some of the partners I have made over the years include magazines, museums, nature sanctuaries, blogs, nonprofit organizations, book publishers and K-12 schools.
You should begin the process of choosing an outreach partner as soon as you’ve identified the science project and make sure that the science team is comfortable with your outreach method. This part of the project can honestly be the most fun, especially if you have some face-to-face element of your outreach. There is no substitute for seeing people’s reactions to your work and knowing that you have made a lasting impression.
Making A Difference
My final advice is to start small and local. Begin a conversation with a scientist working in your area or inquire about conservation efforts in your community. Visit museums or nature sanctuaries and ask how they use photography and if they host lectures. Personal connections nurtured over time will lead to more connections and more ambitious projects. Nature needs our help, so consider using your skills and expertise to make a difference.
See more of Chris Linder’s work at chrislinder.com. Learn about Woods Hole Oceanographic Institution at whoi.edu.
The post Seeing For Science appeared first on Outdoor Photographer.


