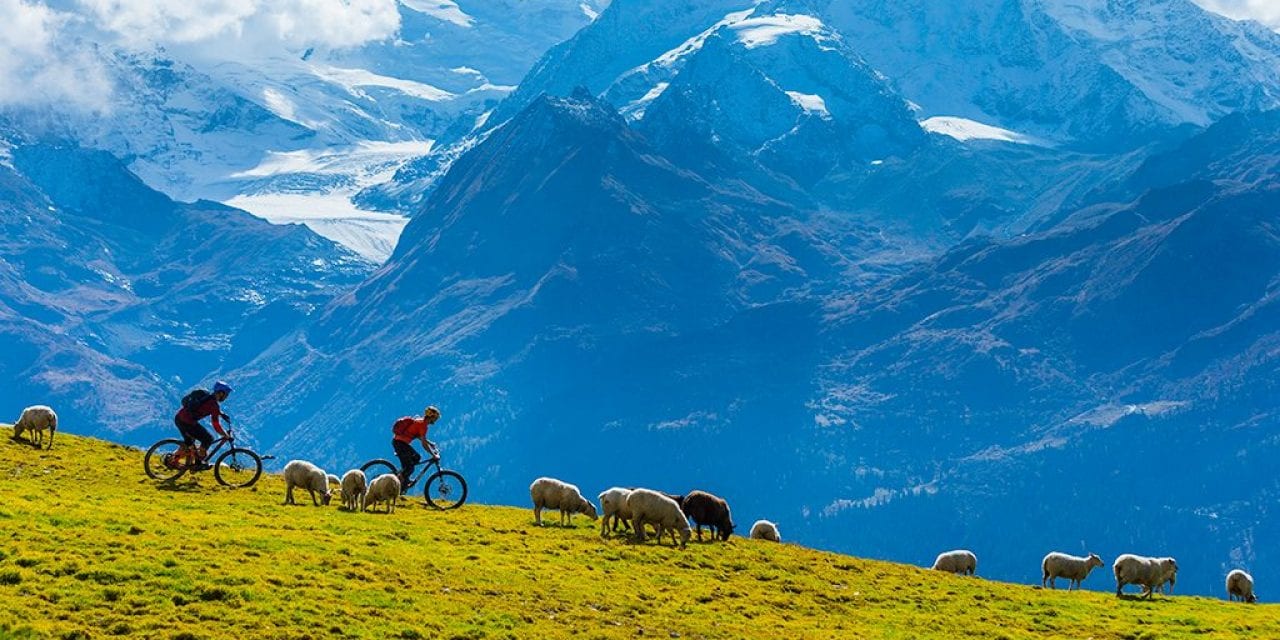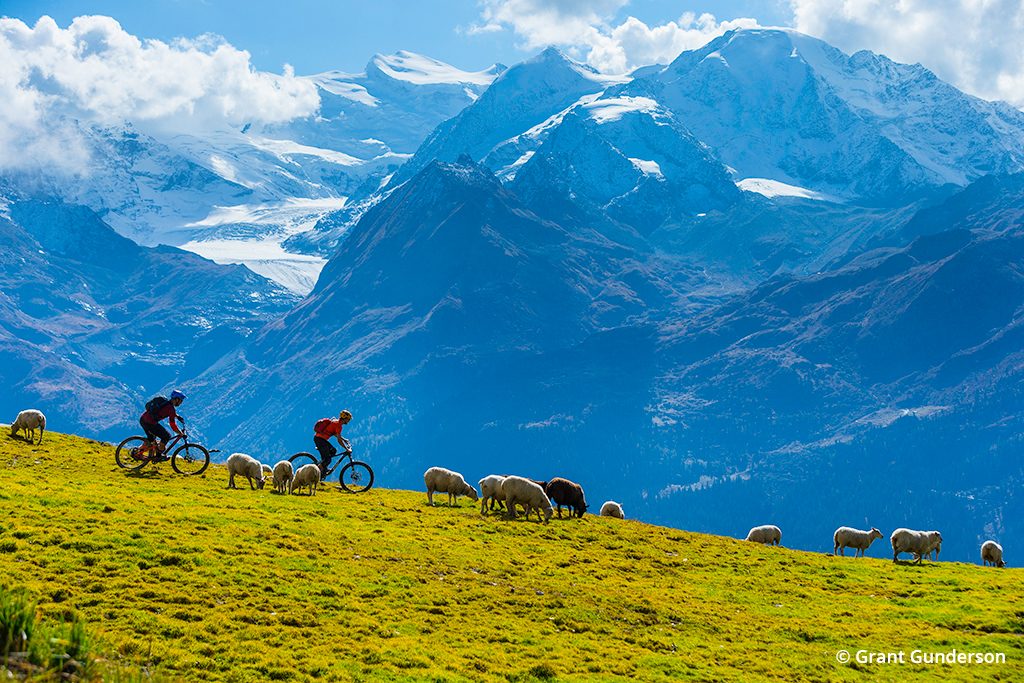
This photo of riders Carston Oliver and Brice Shirbach was taken on an assignment for the Swiss Tourism board. We had been riding and shooting in the alpine around Verbier all day when we came across a herd of sheep grazing along the trail. Normally when shooting into a backdrop of big alpine peaks, I would use a telephoto to compress the scene. However, it was important here to make sure the frame was wide enough to capture the herd, so I opted for a mid-range focal length and aperture to better show a sense of place. The resulting image had a bit of a “Sound of Music” feel to it and captured the essence of Alpine biking in Switzerland. Canon EOS-1D X, Canon EF 70-200mm f/2.8L IS II USM at 75mm. Exposure: 1/1000 sec., ƒ/5.6, ISO 100.
Location, location, location. It’s the No. 1 rule of real estate, and the same principle is true for outdoor photography. As photographers, we are always seeking out the most scenic locations, and the best spots are usually the most remote, often requiring us to travel great distances via trail to reach them. Mountain bikes are an incredible tool that we can utilize to reach those places. They are quiet, allow you to cover greater distances in a shorter time than hiking, and, according to a National Park Service research report conducted by the U.S. Geological Survey, mountain bikes produce less erosion than hikers and horses. Not to mention—it’s incredibly fun to ride bikes.
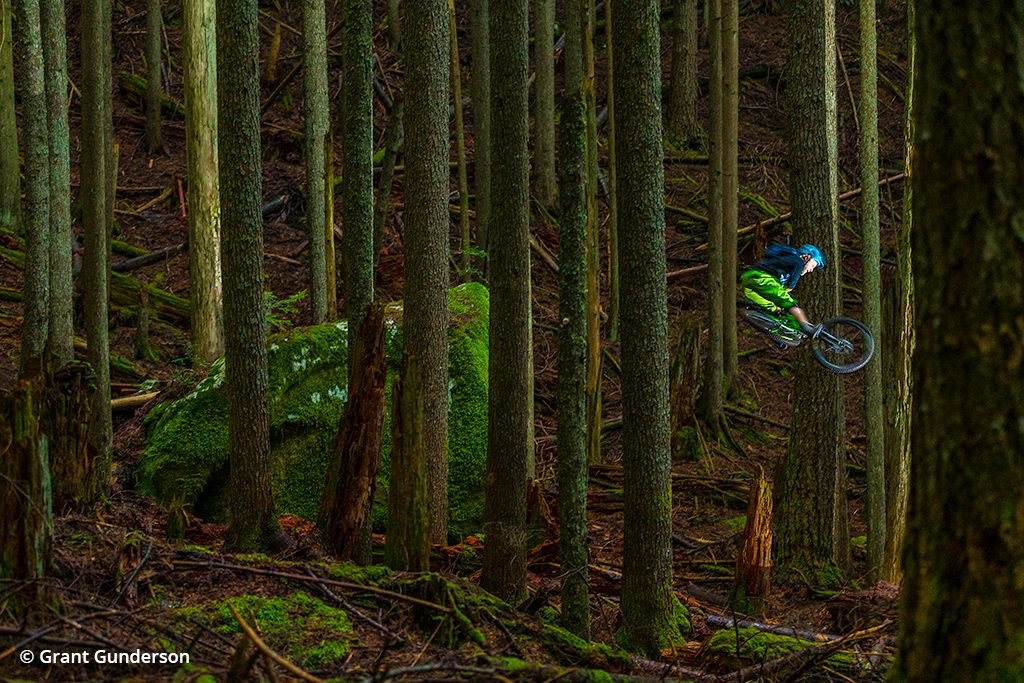
Photo of Kelend Hawks taken behind my house in Bellingham, Washington. This particular trail is on a heavily wooded, north-facing slope that never receives direct sunlight. Wanting to minimize the contrast, we waited for an overcast day to shoot Hawks jumping off the large glacial erratic. The biggest challenge here was the lack of light. I maxed out my exposure with the available light (1/125 sec., ƒ/2.8, IS0 4000) and was still unable to get a fast enough shutter to stop the action. To correct for this, I used an Elinchrom Ranger RX Speed AS speed pack with an Action head and triggered it remotely with PocketWizards. The very fast duration of the strobe froze the action while the background exposure was created from the relatively slow shutter speed. Canon EOS-1D X, Canon EF 70-200mm f/2.8L IS II USM at 70mm.
Adding The Human Element
Nature photographers are drawn to dramatic landscapes, and we often feel an intimate connection to them, yet we seldom include people in those images. Adding a human element to our landscape images is a great way to not only show a sense of scale and place but also to invite the viewer into an emotional connection with the image. Unlike conventional sports photography, action sports imagery, such as mountain biking, skiing and rock climbing, is more about revealing a sense of place and using a human element to convey the feelings that go along with it, whether it be the emotion of triumph when finally making it to the summit, the exhilaration of speed while chasing friends down single-track tails, or the feeling of weightlessness of a “perfect air.”
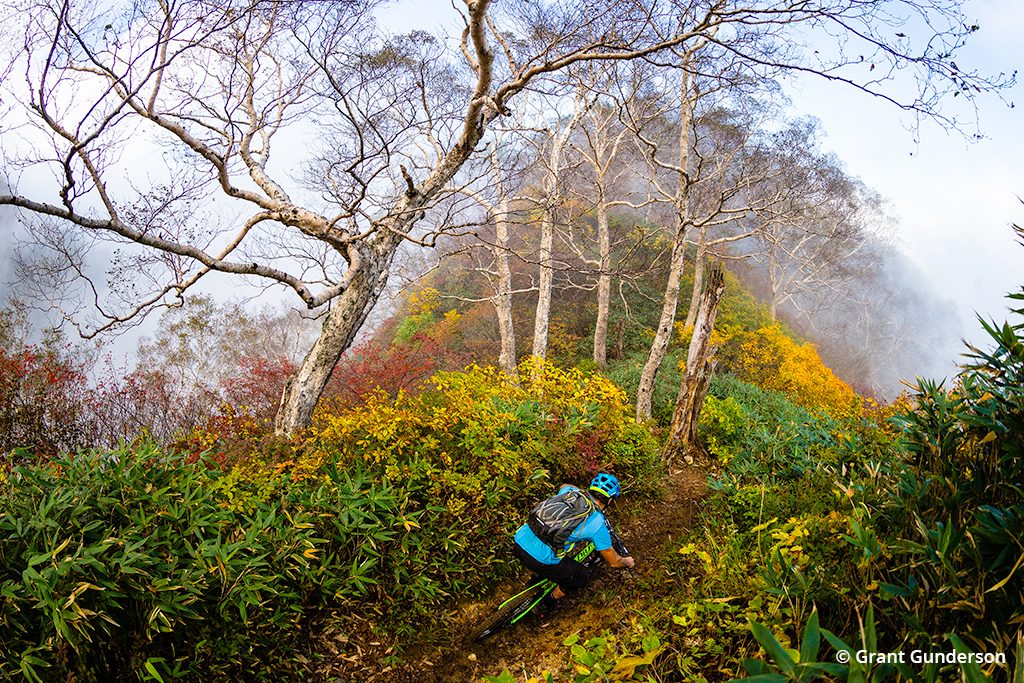
KC Deane and I have spent the better part of two decades skiing in Myoko, Japan. Figuring the terrain was perfect for mountain biking—plus, it’s tough to beat the fall foliage in Japan—we headed over for an autumn biking trip. The bikes allowed us to cover a ton of distance and elevation. On this day, we did 20.58 miles and 7,724 feet of elevation gain on a traverse of Mt. Myoko. In order to show more of the surroundings, I roughly framed the image and then held the camera over my head to get a better view of the foliage falling away on both sides of the ridge. Canon EOS-1D X, Canon EF 8-15mm f/4L Fisheye USM at 15mm. Exposure: 1/1000 sec, ƒ/4, ISO 500.
The key to capturing mountain biking, and adventure sports in general, is to anticipate the action. Over the years, I have found asking myself the following questions every time I look at a scene helps me to be better prepared when the action happens:
- Where on the trail will the rider be at the apex of a turn?
- Where on the ridge will the light be the most dramatic?
- What makes this section of trail so fun?
- What sort of emotion am I trying to convey? For example, is it triumph from clearing a section of trail or reaching the summit? Is it adrenaline from a jump or a high-speed descent?
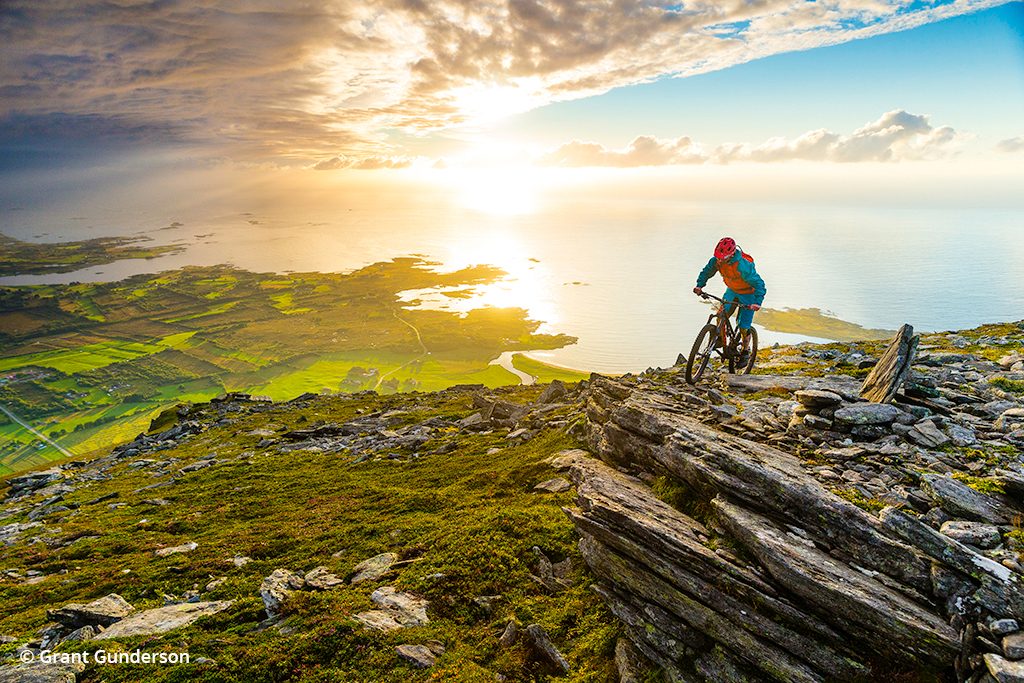
I made this image on a mountain bike trip exploring trails along the west coast of Norway. It had been raining for a week straight, and the forecast was for a chance of clearing that evening, so we did a three-hour climb to get to the top of a peak overlooking the Atlantic Ocean Road. Luckily, the weather cooperated with us, and we were treated to a spectacular sunset. In order to balance the exposure, a Schneider 2-stop Grad ND was used to hold back the sky, along with a large, collapsible reflector to provide a bit of fill light for rider Jonathan Maunsel. Canon EOS-1D X, Canon EF 24-70mm f/2.8L II USM at 24mm. Exposure: 1/500 sec., ƒ/5.6, ISO 500.
Whenever possible, I like to do a 360-degree walk around the section of trail I am shooting, as this can either present options for interesting angles or suggest techniques to capture the scene.
Basic Techniques For Photographing Adventure Sports
Many of the same techniques we use for landscape photography also apply to capturing images of mountain bikers. For instance, you can use a graduated neutral density filter to hold back the sky to better balance it with the foreground, creating a more pleasing and dramatic image. When shooting in the alpine, you can use a telephoto to compress the scene and really give the mountains a sense of scale. Another instance where your landscape photography instincts work well is by using wide-angle lenses and a small aperture to increase the depth of field.
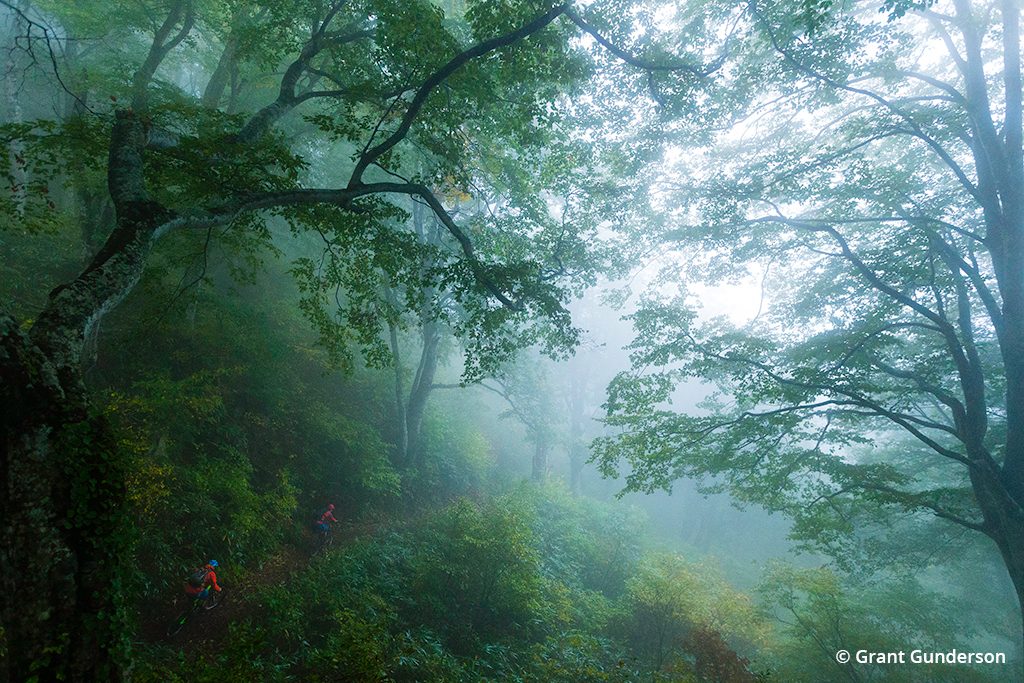
Japan got hit by one of its many fall typhoons during our last week in Nozawa Onsen, which created for some damp, foggy conditions that are perfect for moody light in the forest. So, we donned our rain gear and went exploring. The nice thing about shooting in the fog is that it serves as a giant softbox, creating very diffused, moody light. It can also act as a reflector and actually provide you with more natural light in the deep forest than you normally would have. In this case, the fog not only created more depth in the image, but also I was able to use it as a source of fill light so that I had enough illumination to get an exposure of the athletes against the dark trail—without having to use an artificial light source. Canon EOS-1D X, Canon EF 16-35mm f/2.8L II USM at 18mm. Exposure: 1/640 sec., ƒ/4, ISO 3200.
Photographing mountain bikers is more challenging when shooting in the forests. In those locations, it is best to avoid the high contrast of sunny days and instead seek out the soft and dramatic light that overcast and even rainy days can provide. The challenge then becomes dealing with low-light conditions, so a high ISO helps keep the shutter speed in an acceptable range. Another good option is to use off-camera flash trigged by radio remotes to freeze the action while using a longer shutter speed to capture the scenery. Selecting a large aperture to create a shallow depth of field is also another great way to convey the feeling of riding amidst a tightly spaced forest.
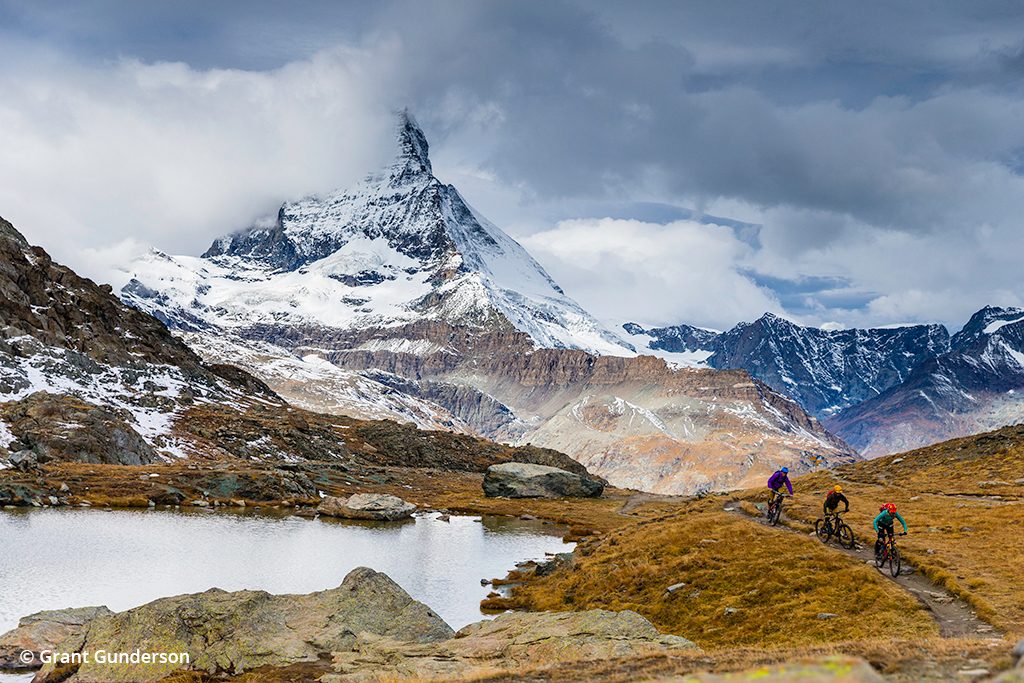
Zermatt, Switzerland, with the Matterhorn looming overhead may very well be one of the most scenic areas in the world. That same beauty also makes it one of the busiest places, too. In order to hide the crowd of tourists day hiking, I got low to the ground and used the rocks in the foreground to block the random hikers. I then used a Schneider 3-stop graduated ND filter to hold back the exposure of the sky and the Matterhorn’s snow to better balance the exposure. Canon EOS-1D X, Canon EF 24-70mm f/2.8L II USM at 53mm. Exposure: 1/1000 sec., ƒ/4.5, ISO 100.
One of the best things about photography is that there are almost always multiple solutions to a problem. When shooting adventure sports, the athletes can have a unique vantage point, so don’t be afraid to listen to their ideas. Creativity comes from experimentation. Move around. Don’t let yourself get locked into a single vantage point, and don’t be afraid to try combining different photographic techniques to solve a problem in a new and interesting way, such as combing graduated ND filters with fill light or remote flashes with a telephoto lens and a large aperture.
Equipment Recommendations
When planning for a bike-based project, choosing the right equipment to bring is essential. In addition to having the proper safety equipment—helmet, riding gloves, eye protection and quality riding shoes—it is important to adapt the weight of your gear to what you are comfortable with carrying, given your riding experience.
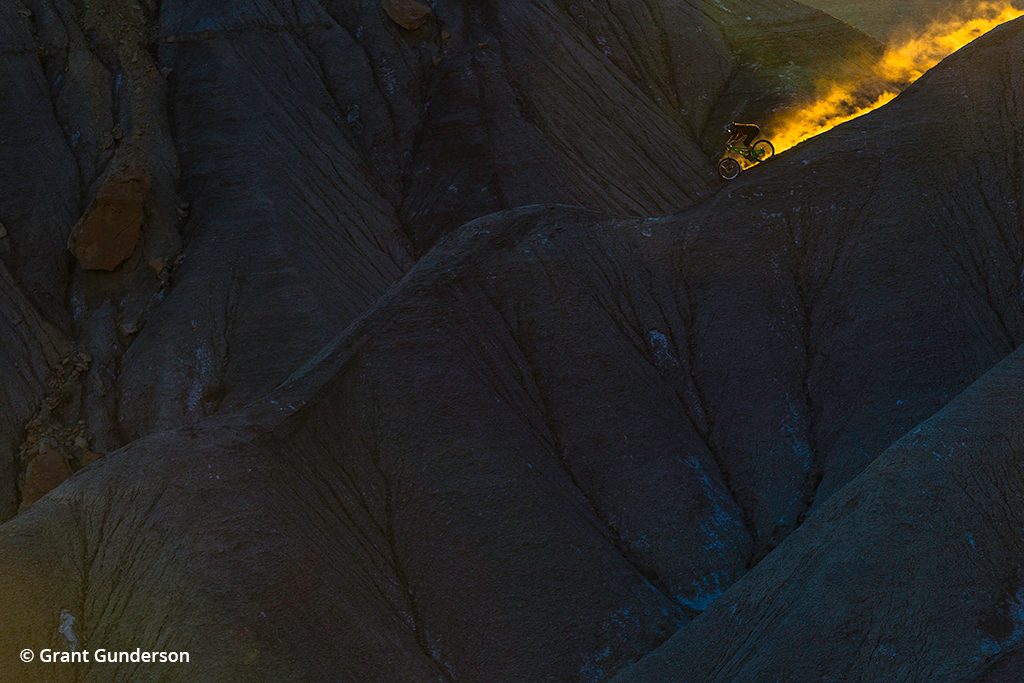
Green River, Utah, is a pretty incredible place to shoot mountain biking. The unique combination of the terrain and soil provides for a biking experience that is the closest thing I have experienced to heliskiing in Alaska. Knowing that the best ridges for riding in the area are situated on a north aspect, we decided to aim for a sunrise shoot so that I could photograph into the rising sun, backlighting the rider, KC Deane. Whenever possible, I like to shoot into the sun. This backlighting effect creates more depth to the image and, given the right combination of terrain and aspect, you can use that backlight to highlight your subject. Not wanting to miss the sunrise, we arrived to the location earlier than expected, so we took advantage of the very first rays of light to create this shot. Deane then ran back up with his bike, and we shot it again with the full sunrise. Canon EOS-1D X, Canon EF 70-200mm f/2.8L IS II USM at 200mm. Exposure: 1/1000 sec., ƒ/5.8, ISO 800.
My typical setup usually includes a Canon EOS-1D X, Canon EF 16-35mm f/2.8L II USM, EF 24-70mm f/2.8L II USM and EF 70-200mm f/2.8L IS II USM lenses, plus a Canon 1.4x teleconverter and Schneider Graduated ND filters. However, I often calibrate my equipment selection to the location. For example, if I am shooting in the deep, dark forests of the Pacific Northwest, I tend to leave the big telephotos and my filters at home and pack fast lenses, a couple of flashes and a camera body that handles high ISO well. Conversely, if I am shooting the high alpine of Europe, I’ll leave the flash gear at the hotel and bring my graduated ND filters and a teleconverter.
Having the right camera bag to carry it all is also extremely important. The ideal camera bag keeps the center of weight for the gear as close to your back as possible. It’s also important to leave chest-mounted bags at home as they will inhibit your handling of the bike, and too tall of a pack will interfere with your helmet.
Mountain bikes are an incredible way to way to see vast spans of the backcountry. They can also serve as a dynamic subject to photograph. By experimenting with different combinations of basic photo techniques, you enjoy unlimited ways to capture the essence of the sport and the riding environment.
See more of Grant Gunderson’s work at grantgunderson.com.
The post The Human Element appeared first on Outdoor Photographer.

